In an earlier blog posting I reviewed the Swagman XC2 Bike Carrier (see my review here – Swagman XC2 2 Bike Hitch-Mount Carrier/Bike Rack) and the U-Haul Hitch Install Service and Draw-Tite Sportframe 1 1/4 inch Hitch.
Both the carrier as well as the hitch still work well…
Yet, when the carrier is attached to the smaller hitch receiver on my car (the 1 1/4 inch hitch receiver) and with a big duty mountain bike like the Specialized Pitch on it – there can be some side-to-side movement, especially on rough roads. With the lighter road bike, there is a lot less but still, it can be noticeable on rough roads.
This is not atypical with hitch-mounted bike racks, of course, but I did notice that there is much more movement attached to my car’s 1 1/4 inch receiver than when it is attached, with the conversion bracket (two L-shaped pieces of metal as spacers) to my wife’s SUV with the 2-inch receiver.
It’s not much movement but…
Am I being paranoid? Yea, maybe.
Have bike racks failed and broken and allowed bikes to drop onto the road? Also yes.
Do I want to take any chances with my expensive bikes when a little work may prevent something bad from happening? No.
So I set out to discover where the movement was coming from. My first thought was that the arm going into the hitch receiver was what would be moving and vibrating, and the spacer for the larger hitch strengthened it that much more to dampen this movement while it was on the SUV.
My second thought was that the hitch receiver itself was vibrating a bit, allowing everything else to move.
The hitch itself is secure and attached according to Honda and U-Haul specs, attached at three mounting points with no movement or loose bolts or anything like that. The Swagman XC2 Bike Carrier came with a screw-in locking bolt as the hitch pin which really made a lot of difference when the whole thing was installed, versus some bike racks that I have seen other people put on that have plain jane-hitch pins. The locking bolt is definitely something to look for – but in the case of the Swagman the bike rack itself has a threaded hitch pin hole to match the threaded hitch pin, with other racks that do not have this you would have to buy an anti-rattle anti-sway hitch pin that locks down in a different way, like one of these.
I did some careful observation. And then I attached a safety cable to the carrier and through the cable loop on my Garmin Virb Action Camera (see my review of it here) and duct-taped it to the carrier so I could see exactly what was moving.
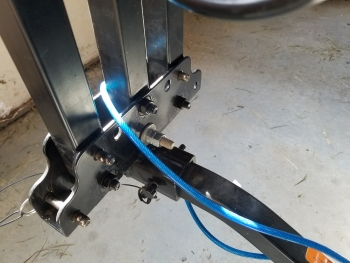
The center part was doing the vibrating, via the movement of the pin at the bottom. This center vertical piece is what the bike ratchets attach to that hold the bike(s) down, it has a removable pin at the bottom and a bolt above it so that this center part can be hinged down either left or right to access, say, the rear hatch or trunk of a car easier.
Neither the hitch receiver itself nor the arm or shaft that goes into it from the carrier was moving, though likely there was SOME sort of movement there that I couldn’t see because, as mentioned earlier, on the 2-inch hitch receiver there was little or no movement.
I had to think back – did I ever use this center vertical piece’s feature of being able to be hinged down? I think I had in the past but usually, I left it in place even if I wanted to access the trunk or rear hatch of whatever vehicle it was on, even if I had another bike inside and was lifting it out. So I had used the feature, but very seldom.
Taking a closer look at it I saw that the pin had a fair amount of play in it – not due to wear or anything, but just from the way it was designed so as to be removed easily.
So the first thing I did was pull this pin and try some bolts from my bonus hardware pail in the hole. One matched it exactly diameter-wise, fitting perfectly with no space or play around it. I found some matching washers and nuts and tightened the whole thing together, double-butting it and putting a little thread lock on the outer nut (you can never be too careful – you don’t want one of those nuts to come off and hit the car behind you while driving). Unfortunately, the bolt is a carriage bolt so I had to put another nut up at the head end also, butting the nut back as far as it would go (for this blog post I included a
photo of the carriage bolt attached, in the photo to the left, but likely I will replace this with a more conventional bolt of the same diameter to prevent any loosening and to make it look nicer).
A quick ride and I immediately saw a difference – the side-to-side movement and vibration had been dampened quite a bit.
Still, there was some movement with the heavier mountain bike on it versus the road bike – a heck of a lot less than before though.
I have previously read several reviews and stories where people’s bike carriers failed – it is hard to say but possibly they had failed either through bad components or from wear or fatigue from lots of vibration and movement. So I decided to go the extra mile and add a strap to secure and stabilize the bike(s) and carrier even further.
A popular safety strap used for bike racks is the Curt Bike Rack Support Strap. Some insurance companies even require this strap to be installed (or maybe one like it) for coverage of bikes while on the bike rack. It’s a very inexpensive extra bit of security anyway.
In my case I had a number of straps and heavy-duty bungees and such lying around, so I made one my own (bending a wide piece of metal into a hook shape and coating it with Plasti Dip for the hook).
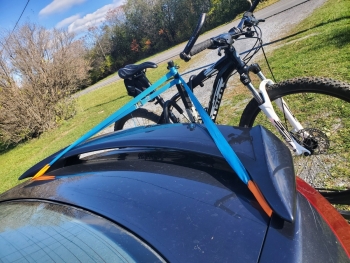
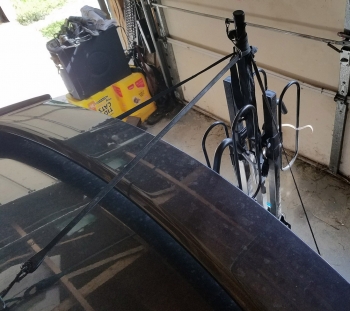
One end of the bungee strap and its hook attached to the vertical center pole of the bike carrier and the other end of the bungee attached to the wide metal hook that I made (which I had cut a slot into for the hook on the bungee) and this, in turn, was hooked over the lip of the front of the trunk, right in the middle. Buying the Curt one or one like it would be the same, though I used a stiff high strength bungee instead of strapping.
The problem I had (which is also the reason I got a hitch receiver and hitch-mounted bike rack instead of using a trunk-mount bike rack) is that the spoiler stuck up too far.
The bungee had to be draped across the top of the spoiler and I was afraid that movement of the bungee – both while installing and taking it off as well as during travel, might scuff the paint.
So I extended the center vertical piece by taking the little rubber thingy off the top and finding a piece of thin aluminum pipe that would fit perfectly down inside. Lowes and Home Depot and other hardware stores should have what you need if you have a spoiler or trunk design that isn’t going to allow enough clearance. In my case, I had some scrap aluminum piping that fit perfectly, and I also had the rubber foot from an old chair that fit exactly also. Everything is secured using a couple of lock pins, like these, and painted black.
This worked great, clearing the spoiler well but not adding too much height to the whole thing. I also added two more straps (straps this time as bungees wouldn’t fit through the weather-sealing of the trunk lids as the hooks had to be hooked inside holes on the underside of the trunk lid) with hooks that went around the edges of my trunk, these further stabilized the whole thing no matter what bikes were on the rack.
It’s still not perfect but it is easy to put on and take off, and provides lots of stabilization, even over rough roads.
So with minimal extra work and modifications, I dramatically increased stability and added some good peace of mind. Also note that some of these basic ideas should also be able to be applied to other vehicles like SUV’s in case of movement, or for increased safety.
10/25/19 – Also see this blog post on making (or buying) hood and trunk straps for securing items; I used my homemade hood/trunk straps in place of wrapping the strap under the hood or using a hook under the edge. Very very secure.
 Also, see the blog entries – Review – Swagman XC2 2 Bike Hitch-Mount Carrier/Bike Rack and Flexible LED Lights to Make Bike Carriers/Racks More Visible – Video


