
 A few years back we had bought a canoe, an Old Town Saranac 146, and while it worked quite well it also was big and bulky, slow and hard to load onto the Ford Edge and certainly didn’t fit on top of my Honda Accord Coupe. Though the kid up the road loads a large older model canoe on top of his Civic; so I guess it can be done but it’s not something I want to carry around on top of my car…
So after a few years of using the canoe and the occasional borrowing of a kayak from friends, not to mention the fact that I actually got comfortable enough on the water after learning to swim; I decided to get my own kayak.
I had been looking the year before but wasn’t sure about it, and had passed up a great deal on a twelve-foot kayak from Tractor Supply in the last fall. As it turned out I am glad I didn’t go with the twelve-foot one.
After a lot of research I knew I wanted to start out with something nice and wide and stable, but not so long and heavy that I would have trouble getting it on the car as well as off and transporting it, and I didn’t want to pay an arm and a leg for it as I wasn’t sure if I would use it that much, whether I might want to upgrade at some point. Plus I am frugal, and I also know that the fairly good gas mileage I got with my car would be affected by carrying something on top of it.

I checked Craigslist and Facebook Marketplace, both of which had a few here and there – varying from cheaper ones that were being sold for about the price that they could be found online for as well as much nicer ones that were going for more than I wanted to pay at this point.
Though the long sleek sit-in ones sure held my eye. I knew a stable, wide sit-on one isn’t going to be fast but is much better for a beginner.
And there’s always the possibility of one of the sit-in kayaks rolling and a person getting stuck underneath and needing help, or worse. And my swimming is certainly only along the level of a beginner yet. Not to mention the ease of getting in and out of a sit-on one and such.
I eventually decided to just buy a fairly cheap one from Walmart instead of a used one that might be scratched, bumped, or abused.
The local Walmart had just one Sun Dolphin Destin kayak left, lime green (yea, maybe not my first choice as a color but it is very visible; which is a big plus) – this is a $200 sit-on kayak which may be discontinued or being replaced with the Sun Dolphin Bali series. The Bali series has a few more things than the Destin, most notably the adjustable foot pedals but it is missing a nice padded seat (it does have a padded backrest) and it’s weight capacity is lower than the Destin by 50 pounds.
Unfortunately, the kayak section of Walmart was kind of disorganized, probably due to the lateness of the season (even though it was still August). But I was able to easily look the Destin all over and make sure it wasn’t scratched or dented. And despite there not being a UPC code to scan I was able to buy the kayak at a nearby register easily enough by just showing the cashier the price on Walmart.com at which point she did her cashier magic of overriding and codes and entering and before I knew it I was the owner of a kayak and $200+ lighter.
After a bit a few Walmart guys came to get things ready and one left and the other stayed to help me carry it out, one thing I noticed was the Walmart guy made a point of saying twice that he’s not allowed to help me put the kayak on the top of the car. I told him that was perfectly fine and understandable and the guy said that I was the first one who had ever told him that that was okay and didn’t argue.
Since this was the last one in the store and it was late in the year for kayak sales, and they weren’t getting anything new in they had lost the paddle to my new kayak and anything else that came with it. The specs sheet was with it as well as something like a title/statement of origin but nothing else. The Walmart guy offered me the choice of a paddle from another kayak so I took a black one.
He and I carried it to my car and set it down, and he reluctantly told me again that he couldn’t help me load it

and I assured him that I could do it and that I’d have to anyway to use it.
I had previously bought a kayak carrier kit on clearance so I proceeded to open this up and start to put it on. This consists of a nice drawstring bag, two wide foam pads with a slight V-shape on the top, two straps with buckles that have a protective pad over them, and a good long length of plastic rope.
Previous to this I had also installed my own tie-downs under the edge of the hood and trunk. This consisted of cutting some straps, melting the ends so they didn’t fray, and adding a pair of bolts and nuts along the edge of my engine compartment – right under the rim of where the hood closes – and another set under the edge of my trunk lid. The bolts go through holes I made in the looped over straps, making an easily deployable tie-down system that can be tucked out of sight when not in use.
On most vehicles, I think you would find some handy bolts already under the hood and somewhere in the trunk but with my car I replaced a plastic screw that is used to hold the plastic trim around the edge of the engine compartment with a real bolt, nut, and lock washers but used some existing bolts on the hinge system of the trunk for the rear. I also installed this same system on my wife’s Ford Edge which worked well.
If you make your own you might also use grommets around the end of the straps to prevent ripping (I am likely going to do this at some point) – there are rubber grommets and there are metal grommets or you can just buy your own pre-made straps like these or temporary ones that don’t need to be bolted in.
I highly recommend something like this instead of trying to run the ropes from under the front and back of the vehicle – not only is it harder to crawl under the edge of the vehicle to find a hole but the rope can rub and scratch your finish, or catch somewhere or break because of this. I may do a little blog post on this at some point, in the meantime here are a few quick pics.
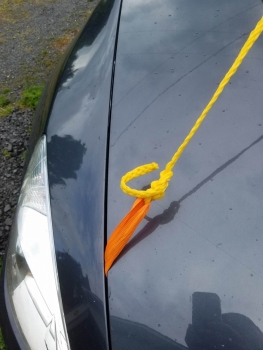

I found that putting the foam kayak pads on the edge of one side of the car and lifting the kayak onto them, and then sliding the pads and kayak together over to the middle was the easiest and safest way of doing it. Trying to position the kayak pads in the middle and trying to get the kayak on top without knocking them out of the way or over meant a lot of moving around and the possibility of the kayak touching the top of the car – maybe not a big deal when it is brand new but after it gets a little sand or dirt on the bottom after use it’s probably not a good thing to have happen.
The V-shape of the pads really didn’t help as the bottom of the kayak is fairly flat with a pair of shallow ridges for tracking. Despite the different shape between the kayak and pads it fit on it fine after centering. The straps go around the top of the kayak and down the sides and wrap around under the roof of the car through the open doors. Then the rope is cut in two and tied from one tie-down strap up to the kayak through where the carry handle is mounted and back down to the opposite tie-down strap, this is repeated on the rear. If you are not using a tie-down strap to attach to, you need to find some place to tie off under the edges of your car somewhere. Tuck any extra rope somewhere or trim it, jsut be aware of leaving some extra in case you find that the kayak should go further ahead or back on the vehicle.
With my car – a two-door coupe Accord – there is less distance available to space the straps where a four-door vehicle has the extra door and subsequently more space to distance the two straps further apart. Despite that it is very secure on my car, amazingly so.
Of course, if you have regular kayak racks or something else for carrying the kayak you’ll attach/carry it with whatever that method uses.
I know on a few of the kayak forums some people have been really down on the foam kayak pad system but wow – it works great for me, and it is quick to put on and take off and is VERY secure.
The Destin weighs about 47 pounds or 21 kilograms and the length is actually 10 feet four inches (315 cm), with a width of 31 inches (79 cm). While this isn’t that much weight – lifting it onto the top of a car is still a bit of a chore but not extraordinary strenuous, unless perhaps you are not very strong or are short; in which case you may have to have help or a different system to help you load it.
There are front and back carry handles as well as ones on either side of the kayak, all of which help when putting it on top of your vehicle or loading it, as well as taking it off and putting it into the water. The front and back handles are nice rigid plastic handles with ropes through them, attached to a loop at the bow and stern. The side handles are plastic rigid plastic with straps through them also. I find that I can carry the kayak with one side handle but I usually curl my other hand around the edge of the cockpit for more stability. And I don’t necessarily like to put the whole weight of the kayak on just one strap.
If you have done any research on kayaks or know anything about them you’ve more than likely heard the name Sun Dolphin – they turn out many different model of moderate prices.
This Destin is covered by their lifetime warranty and is designed, molded and assembled in the US right in Michigan.
It is made of the standard blowmold UV-stabilized polyurethane like many sit-on kayaks are made of, and others. In other words, it is very durable, resistant to bumping and indentations and can be left out in the sun without it breaking down the plastic as happens with other plastics.
This blowmold process and how it is manufactured seems to also help prevent the air inside that is being heated by the sun from expanding the interior airspace, or blowing it up. This also allows it to resist indentation – monetary as well as longer-term ones – the latter of which is something we had personal experience from while carrying my wife’s larger kayak on a badly designed carrier. The carrier dented the plastic sides of her kayak (manufactured using the safe process) and left these indentations after the kayak was unloaded. But within minutes one of the indentations disappeared and the other did after a slightly longer period. Now there is no trace of the indentations.
It seems to be a great design and this plastic and process a relevant invention for kayaks, the airspace inside makes the already very buoyant plastic vessel even more so, making it nearly unsinkable. I have read that even a holed kayak that is filled with water will still float, albeit mostly below the surface so that the top is at water level. Not something I am going to test 😉
My lime green one is very visible, and I think the only color this model came in. The logos along the side are stick-on and likely won’t last forever, but no big deal.
The seat is padded, not overly so but it seems comfortable for long periods for me. The seatback is also padded and adjustable via two straps on either side, these can easily be adjusted while paddling. For long periods I have to make a few adjustments over time but it still is quite comfortable.
The footwells are graduated so that the outer edge of your foot can be braced or rest on them at any point along the side of the cockpit – which makes it accommodate everything from a child to a tall adult. I am five foot ten and I like the last slot for a very slight bend in my knees. I can stretch my legs fully by pressing them past this last slot and I can not reach the farthest foot position so it should accommodate a person over six feet tall.
 Unfortunately this is one of the few things that I wish were different, and really this is something that may not affect others. For me I like to really brace my feet and paddle hard sometimes, the hard paddling uses not only my upper body but my core and somewhat lower body including the legs and feet for bracing. When I am paddling casually the graduated foot slots are fine but when I am paddling hard – something that most people buying this particular kayak probably won’t do – I could use the support of a full footrest or pad. As I said – this probably won’t matter to most people.
I set out to find a solution but it wasn’t as easy as just sticking something in there as the footwell has an angled, rounded shape that doesn’t make it easy to find something to fit it.
So I used some Styrofoam packing, carefully cutting out a similar but larger shape and trimming it down until I got something that would fit into the far end of the footwell. This worked okay but I ended up running across a pair of pedals from an old exercise bike, I took out the metal shafts and weights leaving only the hard but light plastic. These I hot-glued to the tops of the Styrofoam forms I had made, and Velcroed these in. After a few adjustments over a few trips, I have them quite nicely situated and angled, with the ability to tip them up out of the way to stretch my legs or access the front scupper plugs.
The cockpit seems roomy to me but the right size so I fit it well, and it allows me the stability to use my body to turn the whole thing on a dime, with the help of the paddles. It really feels like an extension of the body sometimes, there’s no side-to-side movement of the body inside the cockpit when paddling hard.
But unfortunately while it does track well in general, paddling does wiggle the front back and forth a bit, though it seems that for a ten-foot mostly-flat bottomed kayak this is inevitable no matter how well it tracks otherwise. There’s just not enough length nor enough of the boat in the water to keep it tracking exactly perfectly. For the average person this is not going to matter, if you are a speed demon this wiggle while under heavy power is going to decrease your speed. But you probably didn’t buy this kayak to go super-fast anyway. For regular use it has a bit of a wiggle but nothing substantial.
I could almost complain about this, but I believe to achieve more perfect tracking would require having a pointy bottom with a bit more surface in the water to keep it going straight as well as more length – and this would be a totally different kayak and not one that is going to be as stable for the beginner or casual ‘Yakker.
Also in the cockpit between the thigh area is an upright water bottle holder, large enough for a large Camelbak bottle as well as an angled bottle holder, also of a good diameter. These angled ones I believe are for people with soda (or beer) cans as the angle allows a can or open container to sit in that space but not be directly hit by splashing water from the paddles. Either of these bottle holders can be used for other things too as they are pretty good-sized, and the angled holder allows space for larger things to sit on top of that space.
The area between the legs is slightly raised, giving you that nice footwell for holding you in place, yet the open cockpit of course affords you quick entry and exit.


There is a large storage area behind the seat, with a depression that fits a 5-gallon pail for you fisherman out there. Though there is no fishing rod holder. I was able to find a waterproof Tupperware box that fits right into the bottom of this pail depression to hold a knife, a whistle, and some rope and a few other things. This is deep enough for a container like this to fit in fully so other things can be stored in this large storage area quite well. There is a nice bungee cord network over this area and this can be unlooped in the middle-side hooks to stash stuff. The bungee cord itself is permanently attached at four points, though the attachment points can be unscrewed to take the bungee off completely if needed.
The front also has another storage area, also with a grid of bungee cord with permanent attachment points at four corners, and side hooks that allow that part of the bungees to be detached and reconfigured. Same thing as applies to the top – could be detached by unscrewing the permanent attachment points to release the bungee.
The front storage is smaller and shallower but still allows a lot of space, though I can’t comfortably access it while on the water. The rear I can access by twisting a bit and reaching back if something is stored at the farthest point behind. I think these maybe are more meant for use while onshore but the rear can be accessed if needed.
 Sitting in the cockpit means you are about mid-way down into the deepness of the kayak – you are not sitting really near the bottom (there is the airspace) but you are not “on top” of the kayak either; which gives you stability, a little insulation from the water via the airspace, but puts you deep enough inside to keep the water out and keep your center of gravity low.
Inside are four scupper holes, a pair under the seat and a pair near the feet. Because these kayaks are very buoyant and have the air space to make them even more so; the scupper holes work pretty well for emptying the boat of water if you get any in. Basically the way I understand and have observed it is the kayak sits so high in the water that the holes don’t usually have a chance to get water into them, and any water in the kayak drains out through them because it is higher than the water underneath.
It works great for the most part but I noticed that if I paddle hard the scupper holes under my rear seem to splash a little water up onto me. Low speed it didn’t do this. I am guessing that whether a little splash comes in at the rear and maybe the front is going to depend on how a person paddles, movement of the water on a particular day, how much a person weights or is hauling, etc. But it is all going to drain out nonetheless.
For me, I bought some scupper plugs from Dick’s Sporting Goods that were supposed to be universal (I love the Dick’s app – connect it to your Garmin or what have you and make Dicks dollars or whatever it is called – okay ‘Scorecard’). They were too large but rather than take them back I decided to do a little trimming, angling the trim just so and so that they fit very securely in the scupper holes but still could be pulled out if the boat needed to be drained at a moment’s notice. Though the ones under my rear would be hard or impossible while on the water the front ones are easily accessible, and that’s where I occasionally get a little water from my paddle or from my feet or shoes when getting in. Otherwise the scupper plugs stay in.
So you may or may not need these, and you won’t ABSOLUTELY have to have them anyway to use it.


There is also an interior drain plug in the back that can be opened if needed. This drains the interior air space. Why, you may ask – would this sealed space have water in it? Well, it’s possible that the various handles, seat attachments, and bungee cord attachments may not have been fully tightened at the factory. A few reviews have mentioned this and some reviews have even sealed the screw holes with silicone.
With mine I noticed there were a few drips of water inside after the first use so I tightened all of the screws and indeed did seal the larger screws with silicone, but after reading about the process of blowmolding and how modern sit-on kayaks work I decided not to fully seal the rest of the screws, just tighten them.
I really am doing some guessing here but just tightening all of the screws without overdoing it, and not fully sealing each screw seemed to be just fine and I don’t notice any water inside the air space via the drain plug anymore. Your results and judgment may vary here.
The only real downside I had with the whole thing wasn’t the kayak itself, but the paddle, which got water inside the ends – the paddle came from another Sun Dolphin kayak at Walmart but all of the paddles seemed to be the same except for the color.
Inside the shafts (the shaft opens in the middle via a little button – there are two holes for this button so you can paddle  using the paddle ends offset if you wish) are sealed plastic plugs but the water seemed to get in via a bit of a seam where the plastic paddle end goes around the shaft and is riveted on. For some reason mine got water inside where my wife’s paddle, from a different model of kayak but which look to be exactly the same model paddle – did not. They are a bit cheap looking but otherwise are adequate except for this water problem for me personally, other reviewers didn’t seem to have this issue.
Also I think I had lost the drip rings somewhere when I opened the bag at the boat launch, or it didn’t have any in it. I temporarily used some O-rings that I had lying around, which worked okay.
But the water inside the paddle ends was kind of annoying, as it increased the weight of the paddles when in use. The biggest annoyance though, was getting the water out. Would I have to knock the rivet heads off, and take the paddle ends off and re-rivet it? After alternately setting the two sections of the paddle with the paddles ends up and then paddle ends down and then setting them flat on the ground I was able to jostle some water out. But setting them out in the hot sun did the job of finishing to dry them out.
After that I used a bead of silicone around the ends where the paddle actually goes over the paddle shaft, and around the rivets, letting it thoroughly dry, and then using gorilla glue tape around the ends just to make sure and to make them look nice. Now the paddles do not get any water in them.
I also used the gorilla glue tape to make a nice textured grip, covering this with a layer of winding electrical tape for more cushioning.
I also found a technique on Youtube for making little electrical tape drip blockers – by cutting a bit of duct tape and attaching it to the bottom of the paddles it can break up the line of water that may drip down onto you before it reaches the drip rings. I used a Gorilla Tape clone instead. This really helped a lot but I was still getting water inside the kayak from hard paddling, easy paddling was fine and of course I could vary my technique to stop the dripping even while paddling hard but this also decreased my speed.
It was obvious from this – my observation of my technique and the length of the paddle as well as some general guidelines for paddle length that I found online (Paddling.com is a good kayak site to check out anyway); that I needed a longer paddle. The one that came with it was about 87 inches.
 So I ordered a Pelican 89″ paddle – which is just the right length for me and is nice quality and fairly light. It also has a little drip square depression on the bottom that breaks up the drip as needed, as well as drip rings and three-position adjustments for the paddle feather.
In the picture at right, you can also see the paddle leash that I ordered – which keeps your paddle near you if you drop it in the water and don’t notice if you stop somewhere; and a pair of sports gloves I had lying around which make for easier paddling on the hands when paddling hardd, but they make kayak-specific gloves also.
Paddling is now a pleasure so you may too consider a better paddle, though outside of the water problem which others may not have had an issue with – the included paddles should be fine for casual use.
The Destin’s underside is fairly flat but with a pair of shallow protuberances for helping it track. This means you can glide over shallow water, rocks and trees just below the surface, and things of that nature. In fact, you can float over shallow water that is almost too shallow to paddle in. This flat bottom also means that it is exceptionally stable for a ten-foot piece of plastic, and sits stabilized onshore when you come in.
I kayaked in one place where there were so many weeds that I was sliding over them as much as I was going through the water and the kayak worked beautifully, as it was light and smooth enough for me to propel myself over the weeds without too much effort.
Some people carry their kids or dogs along with them in this kayak – one reviewer mentioned carrying a 90-pound pit bull and another taking their 8-year old son along – and the kayak was still very stable.
Personally, I don’t ram it onto rocky or gravelly shorelines as others do, nor do I drag it along rough ground. Many people do with these plastic kayaks and they seem to withstand it well, but I carry mine. You can also buy a kayak cart for transporting to and from your car, or if you need to portage a distance. I don’t mind carrying this a short distance but anything past a couple of hundred feet does mean that the bulkiness of it becomes uncomfortable. 47 pounds isn’t that substantial but when it is ten-foot long and 31 inches wide it can become more so.
Just for the fun of it I tried paddling as fast as I could at one point. I got to a, well; what I think is a respectable 4.7 MPH. That was about as much as I could manage with a little current behind me.
All in all, despite a few small niggles of which can be tweaked, and for such a cheap little kayak; I have been tremendously happy with my Sun Dolphin Destin kayak. Whether you are just starting out, or need an extra one or want to try a sit-on, or just want a plain casual stable kayak for fun check out the Destin. Don’t expect perfection, but expect to have a hell of a lot of fun with it.
Note as of 2022 – this model is not manufactured anymore but you can still find it at various places. It has been replaced by the Sun Dolphin Bali SS 10.


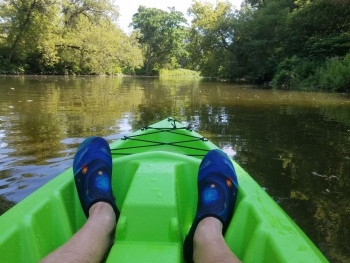
The author kayaking along the channel to North Colewell Pond, Jefferson County, NY.
Photo by Jennifer.


