I didn’t come up with this DIY hood and trunk tie-down method or anything, but it works so well I thought that I would create a little post with pics to show how well it works.
Previously we had a large canoe that we carried on top of a Ford Edge and no matter how we positioned the tie-downs attached from underneath the front of the vehicle to the front of the canoe the ropes or straps they’d always rub against the sides and sometimes break.
When I bought a kayak I wanted to be able to tie it at all four corners of the car but I plan on keeping my Honda Accord for a long, long time so I didn’t want any scratching or rubbing. And, because it is a coupe, I wouldn’t be able to get the straps that come with the kayak carrier kit to be far enough apart for my taste – the front to back roof area is much smaller than a four-door version and there is, of course, only one door space to slide the straps around.
I’d been aware of the kayak hood straps for quite a while but had never tried them on the Edge, so I set out to find a few websites with tips on making my own. Though buying them isn’t very much – but I was buying a kayak and didn’t want to wait for them to ship, and sometimes things like that can be hard to find in the Watertown area. As a side note – they also sell some that do not have to be permanently bolted in like these and these. I’m guessing they have the same capacity as a bolt-on one for the most part, you’re not carrying a full-sized boat up there anyway (at least I hope you aren’t). I have read some reviews that say these maybe aren’t as durable as bolt-in ones but they look plenty durable to me. These apparently can also be used for the trunk and SUV hatches/tailgate and even for a replacement kayak handle, and maybe inside the edges of doors. It seems like they might fit into the slot at the bottom of a pickup tailgate when it is open but that is just a guess, please comment if you can verify one way or another.
I opted for the simplest method of just cutting some cargo straps and bolting them on.
Basically, you find a nice heavy cargo strap, determine how long you want the strap to stick out from around your hood and cut it to twice the length plus enough for the ends to reach under the hood to something they can be bolted to. If you are using nylon make sure you burn the ends with a lighter so it doesn’t unravel.
Use a heated nail or something like that, heated with a torch, to punch holes through the nylon straps. This way you get a clean hole and one that already has the edges melted shut. Using a drill is problematic as the strap can wrap around the bit. If you have a better method of doing this let me know.
Some people put a grommet on theirs, which is going to make it much stronger and less likely for whatever you are using or found as a bolt to use doesn’t cut through the strap. If you bolt the strap down tight enough it should be pretty good anyway as the head of the bolt is going to provide some extra area to hold it.
But a grommet is probably a good idea, just make sure the grommet is thin enough so that it doesn’t interfere with the closing of your hood. These grommet kits are easy to use but make sure you get one with grommets thin enough for your purposes, or can be pounded/attached thinly enough.
The same goes for if you need to add a bolt (and nut) on under your hood because you can’t find a handy one already there. Make sure the head is not going to obstruct any part of the hood closing or weatherstripping/sound-proofing that may be around it. This goes for the strap itself and is something to be aware of as there is going to be a good tension on this strap. Nothing should be putting too much force on anything but the bolt it is attached to, though there is going to be some force on the edge of the trunk where the strap comes out.
On my Honda, there were a few candidates for bolts but none were in what I believed was the optimal place. A small plastic ‘bolt’ did go through the plastic cowling around the engine compartment under the hood, sitting on top of a double-walled metal ridge underneath. So I replaced the cosmetic screw with a low-profiled flat/Phillips head bolt and a nut, washer, and lock washer underneath, with the strap mounted under the metal ridge and between this ridge and the regular washer. This allowed for lots of strength as the strap was against the metal ridge yet cosmetically the plastic cowling was undisturbed and didn’t have any pressure on the plastic part.
When not in use the hood can be popped and the strap can be slipped inside out of sight (I don’t even fully open the hood, I just release it, slip the strap in, and push the hood down to re-lock it).
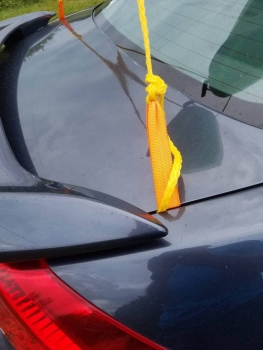
I wondered if the same thing could be done on the trunk. A quick look found some handy-heavy duty bolts on the trunk’s hinge system where it attaches to the trunk lid, and close enough to the edge to do the job.
These bolts had a large head and washer already on them so I had a nice heavy bolt and attachment point, and the strap just clears the rear spoiler. I also found that I can keep one rope longer and tuck the excess in the trunk – just in case of rope breakage or something – so that there is always lots extra.
Again, this provided a quick stable attachment point and easily hidden straps. I also am using these straps as additional stabilizers for my bike rack – see my posts on bike rack mods/reinforcements. With the middle post height modification, a pair of straps at the top of the middle bar mod clears the spoiler and can quickly be attached and detached.
On the Ford Edge there were a few bolts already available along the edge of the under-hood. The best candidates, near the front corners, were under weatherstrips. The weatherstrips were held in place by small plastic elongated oval tabs through small round holes in the weatherstrip, the tabs had to be maneuvered to fit through the holes so that I could access the bolt underneath.
I loosened the bolt and put it through the strap and into the threaded section underneath and tightened it down. It seemed to be very secure; with lots of tugging and pulling to make sure. The weatherstrip went back over the top of it so that the strap was underneath it, this all worked out well as it didn’t interfere with the weatherstripping and also didn’t put pressure on it – the force on the strap going from the bolt to the edge of the hood.
Again, opening the hood allowed the straps to be pulled out as well as hidden after hauling the kayaks.
These proved perfectly secure for holding a large heavy kayak, a fairly quick tying off of the nylon rope from the front of the kayak to the straps was the same as with the Honda. And this eliminated the problems we had before with trying to tie ropes or straps to the front of the Edge. No more crawling underneath, no more trying to tighten things, no more rubbing and flapping and breaking.
The straps I used were standard fare – like these. You can find them anywhere pretty much. Some are a little lighter than others and if you can find the heavier duty ones they are going to last longer, though I haven’t had any problems. Wider ones do tend to be thicker also but be aware of how much clearance you have under the edge of your hood or where ever they are going through.
You could conceivably use ratcheting or locking straps for a tighter hold but be aware of bending your kayak or canoe if it’s plastic, even pulling out mounts or warping the plastic around the mounts for plastic kayaks (or others). I find a good stiff knot on the rope attached to both straps works just fine, and it helps to know your knots. For my kayak I like to take a few extra seconds and also put a couple of knots right in the mount on the kayak too, that way if one of the straps or rope ever let go it still would have the benefit of the opposite one on the other side and still attached to the kayak. Of course, I always use the locking strap around the middle of the kayak that goes around the roof of the car also.
Using this method – whether you make your own straps or buy them – is an easy thing to have access points that can be quickly pulled out and used for kayaks or canoes or anything else on top of the car (that isn’t too heavy).
I am a web developer and fitness geek, but I have a heck of a lot of differing interests. Biking, the Internet, technology, movies, fitness, running and walking and hiking, science fiction, photography, graphics, WordPress, flying and aircrafts, pets and animals, history, and much more. I like to stay very fit but I don’t mind sitting at my computer for work and play either. I live in upstate New York (that’s far from New York City) in a rural area, yet close to a small city, with my beautiful awesome wife, a bunch of beloved cats and dogs and chickens in a very old multi-century house.