

 For this review, I will be giving you my assessment of the Saris M2 Smart Bike Trainer, a relatively moderately-priced wheel-on smart trainer with a lot of features.
Saris is a well-known bike trainer and bike rack manufacturer based in Wisconsin, USA – where they design and manufacture their equipment. And recently (late 2022) was acquired by C+A Global and its sister company Saris Equipment, LLC.
As I am sure you probably know – a smart bike trainer is something that you mount your regular outdoor bike to and which offers increasing realistic resistance like a ‘normal’ or ‘dumb’ trainer does; but also allows various cycling apps, programs, and bike computers to control that resistance in a more realistic outdoor-feel way, with VR training platforms like Zwift being the most popular. Trainers come in various methods of resistance, from magnetic to fluid-filled and require either the rear wheel to be mounted into the trainer or taken off and used with a direct drive; requiring you to take the wheel off and install a cassette, etc (these latter are somewhat more accurate in power output than wheel-on trainers).
The Saris M2 is a wheel-on trainer.
Originally it was the Cyclops Magnus and still shows up as the Magnus on ANT+ and Bluetooth, depending on what you are using.
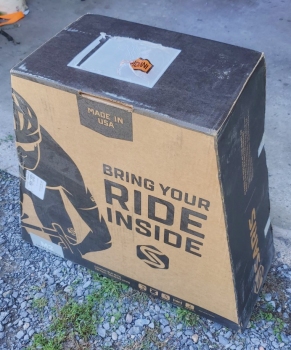
So, on to the review… The Saris M2 comes packed well in a sturdy and neat little box.
This box very prominently lets everyone know that you have just acquired a brand-spanking new bike trainer from Saris, so your mail/delivery person and your neighbors and friends and spouse and everyone will obviously be green with envy and jealousy over your new cycling purchase.
 Hopefully, porch thieves will not be.
The box consists of two parts, the outer one slides into the inner one and is taped together, making it very secure and stable and protective.
The main structure of the A-frame bike trainer is folded and secured in cardboard sleeves inside the inner part of the box and the roller/flywheel/resistance wheel and power pack (unlike non-smart trainers this unit requires power) and skewer are in a bag and secured in their own box inside the folded piping of the trainer structure.
There are assembly instructions and a few other things like a one-month free membership to Rouvy.
The Saris M2 also comes with a limited lifetime warranty, which is nice (make sure you register).
Assembly of the unit is pretty straightforward and easily done with the included tools. One part gave me pause but it was my own issue – thinking I knew how the bolt SHOULD go in when I should have just followed the directions. It took a few minutes of assembly and it was ready to go.
The process consists of bolting on the resistance unit and mounting the adjustment lever on the frame, and then the resistance clutch knob with a bolt. Easy for anyone to do.
The legs fold out for use and back in for storage. Though I usually leave them folded out a bit so that it doesn’t topple over when I store it. The two foot pads on the rear of the A-frame have leveling feet in case the surface you are putting in on leaves something to be desired in the level department, though the folding front legs give it a certain amount of self-leveling ability too. A quick turn of the knobs that make up the ends of the feet lets you increase or decrease it’s level a bit. The structure itself is matte black painted metal, the whole thing weighs about 20 pounds or 9 kilos. It feels very substantial and heavy-duty. The rated maximum rider/bike weight is 300 pounds (140 kg).
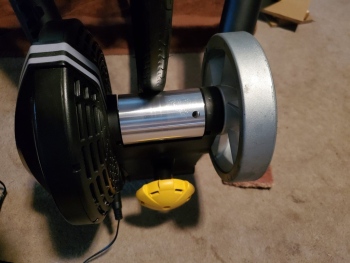
This is a magnetic resistance trainer so there are coils and magnets in a disc on one side, whereas the other side has a flywheel (with a cooling fan inside) with a roller in between. The skewer that comes with the Saris is of a common size and replaces the skewer that is already on the back wheel of your bike, it is easily replaced by unscrewing the existing one and replacing it with this one made especially for this trainer, tightening it. The ends of the skewer fit in perfectly to the nubs on either side of the trainer fork.
To lock it in there is a lockdown level that has three positions for various skewer sizes ranging from 120 to 135 mm, and if you need to you can pick up skewers for other sizes from Saris or other companies..
 One of the hinges on one of the legs was a bit tight and very hard to pop out so I did have to get my socket set out and loosen it slightly, as the included tool only fit the parts that needed to be assembled. I also sprayed a bit of WD-40 Specialist Dry Lube onto the surfaces that touch each other where the legs hinge in and out. The WD-40 Specialist Dry Lube is great stuff, BTW, great on a good many things where you don’t want petroleum-based lubrication and mess.
The overall approximate size of the unit is around 21 1/5 inches (55 cm) wide and folds out to about 27 inches (69 cm) or so and folds to around 14 inches with a height being about 20 inches (51 cm).
The flywheel itself is around two and a half pounds or 1.2 kilos and has a cooling fan inside it. I guess I am not putting in enough power as I never notice anything on the unit getting anything but barely warm! My other bike trainers had much smaller flywheels and resistance units and they got significantly warm, even hot sometimes.
The Saris M2 can be used with most any common bike wheel size including 700, 26″, 27″, 29″, 650b and the trainer info shows that it can take up to a 2-inch wide tire, though there’s plenty more room for more width so I am not sure why that is only up to 2″ (5 cm). The roller is aluminum and 2″ (5 cm), pretty standard.
Max wattage is 1500 watts at 20 mph with a 15% inclined simulation. 1500 watts is a lot, and I think someone like me is never going to even come close to approaching this, on the non-smart bike trainers I have lying around here it is pretty easy to surpass their maximum power, at least for a time.
Accuracy is + or – 5% but strangely the Amazon page for the M2 shows a +/-2% accuracy. But I believe that all other official ratings are 5% so the 2% is probably a mistake by whoever created the Amazon page.
The sound level is supposed to be around 70 decibels at 20 mph (32 kph) but can be pretty loud if you are really putting a lot of power into it and are using just regular tires. There are a plethora of bike trainer tires of all sorts for all sorts of bikes that are going to decrease your overall noise level. But I just use an old tire from the previous season, on mine. Checking the level with a simple decibel meter on my phone seems to correspond to what Saris rates it as, maybe a bit higher. You can also decrease the sound level by using a mat or towel and other things, it really depends somewhat on what surface you have it on in addition to the above factors. Check out the video at the end of this post for a quick demo of the nominal sound level.
The M2 uses standard Bluetooth and ANT+ FE-C for connecting to devices, this allows two-way communications so its sensors are read in one direction and in the other direction can control the trainer’s resistance.
Bluetooth is sometimes better and more stable than ANT+, which is what I have found as well as others. Though Bluetooth seems to only allow one connection but if you have other devices you can also use ANT+ at the same time. Power, cadence and speed sensors are built-in and sent to whatever device you are using.
Pairing is standard, quick, easy and no big deal (on phones and tablets you pair it in the app(s) that you are going to use – not with the phone’s native Bluetooth pairing).
Pair it to the Saris app first for calibration – Android version here and iPhone version here. Though I did have a weird issue with the Saris app at first, and I had to uninstall and re-install it at which point it quickly paired and I was able to jump on and calibrate it. Calibrating just consisted of a quick spooling up to speed and then letting it roll down. Done and over with. It also had a firmware update, which while taking a while was also easy and straightforward. This is also done on the Saris app – as always with any device; don’t unplug it or mess with it while it is being updated.
Also, note here that you may need Location turned on on your phone or tablet when pairing.


I like to put a towel down under the trainer and bike, not only does it provide a little protection and cushioning but frankly you are going to sweat profusely so it is pretty necessary, even with a fan! And it can help dampen some sound. There are lots and lots of bike trainer mats too, that are made especially for bike trainers or you can get a generic fitness mat or a cushioned mat from Lowes or another home improvement store, or any number of things as needed.
So to go over the procedure for setting it up – it’s pretty easy. Make sure your rear bike tire is pumped up to proper pressure and try to keep this pressure as exact as possible each time you use the trainer for consistency in power output. Just set the trainer down and fold out the legs, position your bike so the skewer ends line up with the nubs on the fork of the trainer and push the lever down and it’s locked in. When you assemble the Saris M2 you do have to set the lever position to correspond to the width of your skewer/frame beforehand, which just takes a few seconds of messing with and once it is done you don’t need to again.
A riser under the front tire (as I said – the Saris M2 does NOT come with a riser but there are tons of them on Amazon. I even made my own out of wood), plug the power pack into the back of the trainer and tighten the pressure knob down. The tension knob is yellow and you just tighten it until it clicks – which sets it to the same resistance each time via an internal clutch. Ideally, you may want to re-calibrate at the beginning of a session and as conditions can change, but I tend to not as I am not quite training so intensively that I need exactly perfect accuracy. You may also be able to calibrate individually in various programs or apps that you are using.


There doesn’t seem to be much of a warm-up needed for the resistance to be stable, and as for the resistance changes themselves – they are smooth and pretty quick but not so fast as to be unrealistic.
It is certainly not real quiet, especially when you are really pumping some watts into it. I have maybe mentioned this often here and I don’t want my readers to think that it is overly loud – I would say it’s comparable to the other bike trainers I have and only gets a bit louder because it is able to put up a higher resistance/power output.
Depending on what you have under it for a mat or towel (I highly recommend one or the other) and whether you have a carpet, and how your house is constructed – it can be a bit loud on the upper end; though I could still hear the TV with a bit of a bump in the volume.
Standing up and pounding out as much power as I can in a cardio-swamping hyper-sweat dripping sprint – the trainer is stable and secure underneath the bike; no wobble or instability. Whether you are just spinning, doing intervals, or standing up and pounding out some wattage it is smooth and stable through the whole range.
The flywheel is a good size and its inertial felt pretty good for me, like during coasting and such. But I also came from smaller trainers with fairly small flywheels so this larger flywheel makes a lot of difference. The flywheel also has cooling fans inside. This brings me to the other thing I noticed – because of various things like the higher wattage capacity and maybe the flywheel blades and the fact that it is a heavier-duty unit overall – I rarely feel much heat being generated or retained by the M2. Maybe I just don’t put that much wattage into it 😉
With ANT+ I had a few dropouts on a couple of programs on the computer, but that was solved by switching to Bluetooth and that probably was more a matter of the old ANT+ dongle that I have than any issue with the trainer. The only other thing that caused a slight burp was certain user-created interval workouts in Kinomap – most worked fine but a few increased the resistance too much on my particular trainer, I am guessing this had to do with the people who originally created that particular user-created routine. This is a non-issue for me as Kinomap seems to have started abruptly charging a subscription for sharing to Strava or even downloading workouts, so I have abandoned this app for others, like Wahoo RGT. See below screenshot.

There are lots and lots of apps and programs that you can use with the Saris M2 – including but not limited to Wahoo RGT, Zwift (the M2 is Zwift certified), Rouvy, TrainerRoad, Bkool, Fulgaz, MyWhoosh, Kinomap, Golden Cheetah (a super swiss army knife of training, but with a slightly steep learning curve and only for computers), TrainerDay, etc Also, noted earlier but worth mentioning again – you may need Location turned on on your phone or tablet when pairing any of these.
Some software allows you to use ERG workouts created with other programs like the site https://doylek.github.io/ERG-Creator/ and run them for interval and training workouts, and others like Garmin Connect allow you to create them yourself right in the website or app.
So to sum up here and to conclude this review…the Saris M2 Smart Bike Trainer is a great trainer, well-made, works flawlessly and smoothly, and a good way to get a smart trainer for a reasonable price that doesn’t break the bank. It’s a couple of steps above a non-smart trainer in quality as well as features, comparable in accuracy to more expensive ones, and is quick and easy to set up and be training with little effort or trouble, and lets you use any major VR training or smart training app out there. Great product, buy it!


