 I’m a longtime advocate of bike mirrors, in one form or another (and bike safety in general).
Sure. some riders think bike mirrors look geeky or funny-looking, others just don’t like them, and still others (like bike weight weenies) think the minuscule weight or tiny wind resistance they add is going to slow them down or something. Tell that to me when there are two tons of metal barreling toward me and swerving back and forth…
Though using a mirror requires practice and some people likely never will get proficient at using one, and may even be more dangerous as they try to see what is behind them. It takes practice.
In this review, I will be covering a couple of what seems to be popular lower-priced helmet-mount models, but there are many others of all sorts and forms. You can find mirrors that attach in many ways including to your sunglasses/eyeglasses, handlebar, bar ends, wrists, and even shoes and front fork, etc.
The two mirrors that I am going to review here are the Cycleaware Reflex Bicycle Helmet Mirror and the Race Icon Bike Mirror.
The Cycleaware mirror is one that I have had for many years so the review for it is the result of long-term use. It’s a popular mirror sold most anywhere biking-related that sells mirrors.
The Race Icon one I have had for a few months. I call it “Race Icon” because that’s the particular company name of the one I bought but it is the same model sold under many names. A quick look at it and you may recognize it as being sold by many others companies. A couple of examples of exactly the same mirror – GXHUANG Bike Helmet Mirror and the dirt cheap SCASTOE one here.
Is it fair to review both of these mirrors against each other when I’ve used one for years and the other one for a short time? Well, as you’ll see in this review it doesn’t take more than a few minutes to notice the difference in quality between the two mirrors, with the Race Icon one coming in lacking in some aspects, specifically the clarity of the mirror. There is a comparable disparity in price too – for a few more bucks you get a better mirror in the Cycleaware model (Cycleaware also manufacturers a number of other kinds of mirrors too, and some other miscellaneous biking items).
But let me get to each in turn.
The Cycleaware Reflex Helmet Mirror
Attaching the base in the right place is fairly easy but it’s good to be as precise as possible, though you have lots of ability to adjust things if needed. You just need to hold the whole thing – with the mirror and arm attached to the base, up to the side of your helmet and see what is the right position. It helps also to have someone hold the whole thing instead. Once you have the place where the base needs to go you can pull the arm and mirror off for easier installation of the tape. You want as much of the base’s tape to touch as possible, not overlapping vents or anything, or hanging off the side, etc.
Mine stayed adhered for many years but eventually the double-sided tape did have to be replaced. Unfortunately the base has a slight ridge around it so that even the thick replacement heavy-duty Gorilla double sided tape that I used needed to be doubled for it to reach the surface of the helmet, though an added benefit was that the two layers conformed real well to the curvature of the helmet cover. Cycleaware also makes a replacement parts kit with a new mirror, 360 joint, base, and double-sided tape. But for the price you probably are either better off cutting your own double-sided tape or just buying a whole new mirror package. Unless you need some of the other parts replaced also.
Make sure you NEVER use super or crazy glue, hot glue, or anything else that may damage or melt into the shell of the helmet or the styrofoam liner to attach the mirror’s base. Nor zip-tie the base on or something where the zip-tie is going to be around both a section of the shell as well as the liner, holding them together. That shell is made to come off in certain situations from what I have read. Double-sided tape shouldn’t harm the safety features of your helmet.
As you can see in the pictures above the arm attachment rotates vertically so that you can push the mirror up out of the way in certain situations, without losing alignment and adjustment (outside of the vertical placement). The arm itself is pretty much infinitely adjustable, and there is a ball and socket joint on the end of the mirror itself that allows horizontal 360 rotation of the mirror and some extra angle adjustments.
So you have lots of adjustments points and flexibility with this mirror. pretty much assuring you of getting it in the correct position.
I’ve occasionally taken the arm and mirror off the ball and socket base mount and it has never seemed to loosen up over use, though I have not done it a huge number of times.
The mirror itself is crystal clear and even after many years of use mine is still fairly clear, but could probably use a replacement. I clean it gently with water or Windex and a soft rag as the mirror is plastic (not glass – which is good). Very good quality. You’ll find the mirror is big enough to give you a good wide-angle but it is not one of those “objects are larger than they appear” mirrors (convex). I have found that when comparing this one to the Race Icon mirror, which does have a convex mirror, that the smaller images of the Race Icon one can be slightly dangerous when gauging how far back a car is.
With this very clear mirror a quick flick of the eye is all that is needed, after practice, to see what is behind you. This does not take your attention away for more than a few miniscule parts of a second and becomes second nature after a time.
BTW, this whole mirror system only weighs 0.7 ounces or 21.8 grams (for the bike weight weenies out there). You don’t feel any weight on your helmet at all with this.
It’s a great mirror and I highly recommend it – both for its quality as well as its durability and flexibility.
The Race Icon Bike Mirror (also sold under other names)
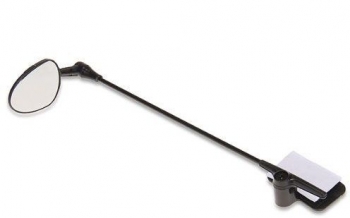
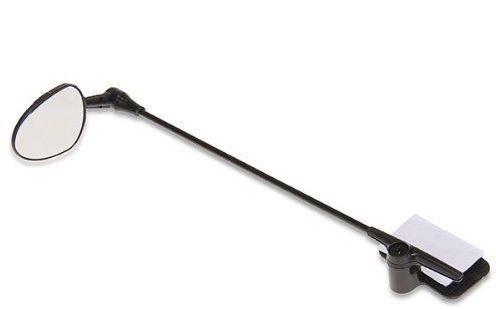
The Race Icon mirror mounts in a completely different way. As you can see in the photos above there is a rectangular pad that slides up under the edge of your helmet, between the padding/straps and the inside of the helmet. You put a strip of velcro (included) on this rectangle and attach the matching velcro to the helmet side. This is very secure and, at least on my helmet, I wasn’t able to tell that it was there as the padding and straps of course are not usually pressed flat against the inside of the helmet. Are there maybe helmets where you WOULD feel this pressing against the side of your head? Possibly, but a quick test (but without the velcro attached) on two other helmets seemed to yield the same results.The velcro is just regular velcro, though you could use a heavier-duty kind. This velcro allows you to detach this mirror from the helmet it is attached to also, but not as easily as the Cycleaware one, and the velcro tape can easily detach from the styrofoam on the inside of the helmet if you are not careful.Just make sure that you do not cut any of the helmet to make this or any other accessory fit! You can try permanently gluing the rectangle but if you ever need to take it off it may take a piece of the helmet styrofoam off with it, so be aware. If you have to use glue then it may not be the right piece of equipment for you or your helmet.
Once it’s on you can adjust the angle vertically at the back near where it attaches to the helmet by loosening the screw there, then re-tightening it when it is in place. At the front of the shaft you can rotate the mirror and attachment in a 360 – including all the way up (and upside down) out of your view. Like the Cycleaware one this is good if you temporarily want it out of your way but want to keep the adjustment. The short arm going from the shaft to the mirror also has a ball and socket adjustment for some angled adjustment. You can also carefully bend the shaft if needed too. It is fairly soft metal so be careful with this.
Initially it may be a bit harder to get the mirror in the right position than the Cycleaware one but it still has plenty of adjustment.
The mirror itself is good-sized, but the quality is low. While you can see traffic behind you and especially movement, discerning details is much harder as the mirror is not as crystal clear as the Cycleaware one. Also, the mirror is convex so objects appear smaller in the mirror. Which makes judging distance to a car behind you much, much harder. It’s best used in bright sunlight, as I found that even the details I could discern were decreased during cloudy conditions or heading toward sundown. Sure, you can say that of any visual equipment, but it was particularly noticeable with this mirror.
It the mirror moves around too readily and loosens then just try tightening the screwed on the end of the shaft attached to the mirror part, there is a spring inside there. On the back section near the helmet make sure that screw is tight enough too but be careful of tightening any of the screws too much.
I found the shaft to be way too long and distracting, not to mention visually unappealing. If you do and you don’t mind a little DIY you can trim the shaft by unscrewing the part that attaches at the helmet, sliding the shaft out and carefully cutting a short piece off, filing the end, and sliding it back in and re-tightening the screw. Do it in very short sections so you don’t cut too much off. A hacksaw makes quick work of the cut.
I don’t know what the weight is but it seems to be very light, and I don’t feel it on my helmet.
Overall – I like the lower profile look of the Race Icon mirror system, especially after cutting the shaft to my specs, and the main shaft can be bent to be closer to the helmet to be more unobtrusive as well as customized to your preferences for location and alignment. Unfortunately the bad mirror severely cuts into it’s usefulness and effectiveness, and it’s really mostly good if you don’t have a mirror and don’t want to spend very much on one.
In Conclusion…
As you probably have discerned I like the Cycleaware mirror much better, and I would recommend going with it if possible. The mirror is much, much clearer and the whole system is more durable and higher quality for the long run, and more adjustable. Looks-wise it loses a point, maybe it’s a bit more high-profile but the mirror and quality makes it worthwhile, even paying a bit more for it than the cheapo Rice Icon one.
But really, any mirror is better than no mirror – as long as you are safe and proficient at using one.
P.S. A Frakenmirror mod.
If you are not a DIY’er than you might want to stop reading here. If you are you may have an interest in the franken-mirror I made from these two helmet mirrors. As I said above I cut the shaft shorter on the Race Icon Mirror, and bent it to conform closer to the helmet (you do have to be careful – the metal of the shaft can easily be bent too far if you put enough pressure on it). In addition I very, very carefully; working at it with my fingernail – took the mirror off the Cycleaware helmet mirror’s plastic oval, added my own heavy-duty Gorilla double sided tape to the back of the mirror, pulled the not-real-well-attached mirror off the Race Icon mirror oval, and replaced it with the Cycleaware mirror. It works quite well so far. Here’s a quick pic:


