I’ve always been a bit of a weather watcher and tracker, for many years I kept precise track of snowfall and temps and other weather events starting with a Commodore VIC-20 and I eventually became a weather spotter for the National Weather Service for a long time. But after a while, I lost some interest and mostly just kept some simple measurements and observations, until Personal Weather Stations became more cost-effective.
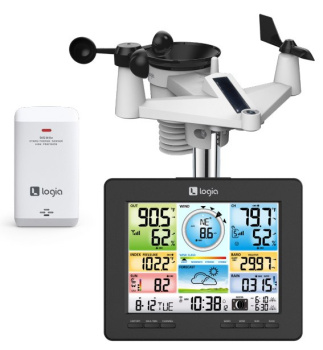
So for X-mas of 2022 my wife bought for me a Logia 7-in-1 Wi-Fi Weather Station with Solar. This weather station comes up pretty consistently on the top twenty when it comes to personal weather stations, but not so much near the top. Think of it as a bit mid-range in some features (like no computer interface) and up there with the other ones for the number of features and accuracy (as long as you position it correctly). There’s not a whole lot about Logia themselves and it’s obviously manufactured for them, it may have clones that are rebranded from or by other companies. Amazon has a number of weather stations and some extra’s including the lightning sensor.
Unboxing is straightforward and all parts are packed in a plain but attractive box. It’s all packed tightly and everything is its own bag(s) including the smaller parts, of which there are few. Unpacking is normal for electronics, everything is packed well and securely in individual cardboard dividers and bags. There is little assembly, just a few parts of the outdoor sensor to put together and of course, but of course you have to mount the external sensor unit.
Firstly I guess that I have to say that it does not come with any sort of mast for the outdoor sensor to go on. I mention this because so many people have reviewed or asked questions about it on Amazon and are upset that there was no mast included. I wouldn’t expect there to be unless it specifically mentions including it, as what it is going to be mounted on is going to depend very much on your particular requirements and the best mounting location. So factor this in when buying this or any other PWS.
The owner’s manual is pretty good, I really can’t complain about it, all things are pretty straightforward and explained as needed without any spurious info, but with detail where needed.There is a minimal amount of pre-mounting assembly for the outdoor sensor, the rain gauge funnel has to be attached to the outdoor sensor; pretty easy. Then the backup batteries have to be installed, consisting of three triple-A in a standard battery compartment (supply your own batteries).
Once that is done you can find a good mounting location. This might take some thought and pre-installation of a mast or other hardware, you might even find yourself repositioning it. To work properly you need at least 6.6 feet (2 meters) off the ground, and a position away from obstructions, including your house. The mounting clamp that comes with the outdoor water station sensor is made to go onto a 1.4″ to 1.6″ (35-40 mm) diameter pole. There’s a bit of leeway there in diameter but not much, though some have said it works fine on a one-inch pole and perhaps you can use some padding to take up a little space. Of course, you can always attach a short section of the correct size pole to something larger, and maybe smaller – keeping in mind how strong a small pole will be in holding the unit up against all weather conditions. You don’t want it swinging/rotating the whole unit (which will throw off your wind readings) or non-level at best, or falling off or breaking at worst.
The manual shows a distance from the sensors to the console having to be 492 feet (150 meters) away. This seems, well high, but I have not tested this.
The outdoor unit requires one CR2032 battery that is included in the box, 3 AA batteries (that you supply), and it has a solar assist so the batteries should (according to the manufacturer) last 2.5 years.
Once you have a suitable mounting location and pole you can put the outdoor sensor onto it, the sensor has one side of the clamp built into it and another unattached clamp section rounds it out, with bolts and rubber pads for helping to secure it and in case your pole is on the smaller diameter side. Tighten the clamp bolts, being aware that the clamps are plastic, so don’t too much torque on them.
I used an Army-surplus heavy-duty mast, but you should be able to buy plenty of mast types on Amazon or various home improvement stores like Lowes.
When mounting the outdoor sensor the side with the rain gauge points north (or south in the Southern Hemisphere – make sure you change the setting when using the Setup UI, I cover this a little further along in this blog post), if you don’t have a compass just download an app on your smartphone (like Digital Compass for Android, Compass∞ on iPhone). But also make sure you get everything level so that the rain gauge works correctly, you will find a bubble level right on the top of the outdoor sensor pod itself.
I want to inject a note here for people who might not be aware; keep in mind that this weather station does not measure snow, you need a much more elaborate type of standalone electronic device for that, usually fairly expensive. Or you can use an old-fashioned measuring stick, you can find some nice ones on Amazon.
The setup of the indoor temperature and hygrometer sensor is really easy, insert a couple of double-A batteries and make sure the channel is set for number 1. You can hang this up or just sit it on a table or whatever, wherever is going to be a good indoor place.
The console itself requires a CR2032 button-style battery for backup, I suppose you could use it without it but the console does need power to display, and to upload data to the Internet. The CR2032 goes into a little battery door like so many things have. Once that is inserted plug the power jack into the console and the plug end into an outlet and the station should start booting up.
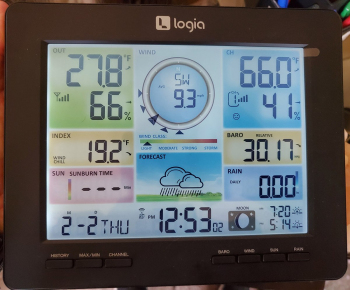
The console is a good size, about 8 1/2 ” x 7″ with a nice color screen size of around 6 3/ 4″ x 4 3/4″ so you can see it across the room but it’s not super large and obtrusive. The backlight has three settings (off, dim, and bright) so you can customize it to the light level you need. It’s readable even in bright sunlight with the backlight on, especially. There is no automatic dimming for the night, but you can do it manually if needed.
It may take a few minutes for it to connect to the outdoor and indoor sensors, give it time – you’ll see the antenna icon flashing. If it doesn’t you can try the little rest button on the console. Pressing it once resets it, holding it for six seconds or more does a factory reset.
You can also try pressing the Wi-Fi/Sensor button on the back of the console if you have issues. You have to do this when replacing batteries in any of the sensors or the console or adding more sensors. If you need to add another type of sensor you do need to change the channel number inside the battery door of the sensor. The display shows only the external sensors and indoor sensor as default, when adding other sensors you press a button to toggle to the next one.
Once the sensors have paired you will see their data on the console and the little antenna icon will stop blinking and become solid.
Now you are ready to continue the setup using Wi-Fi – though you can also start this process as soon as it is powered on and before it is connected to the sensors.
BUT, stop here for a moment – before you continue the set up consider whether you are going to connect your weather station to Weather Underground and/or Weathercloud.
It is much easier to register at these services first and have the data ready to enter then set everything up and come back. So if you are going to use Weather Underground and/or Weathercloud maybe register with them first here, and then continue on.
If you are not familiar with their weather networks you might ask why would you want to? Firstly, you can share your data for everyone’s benefit on these sites, it helps with weather prediction as well as localizing weather for your neighbors and others and for weather forecasting in general (be aware that if you share it publicly it does show your approximate location).
The other reason you may have is that Logia does not provide you with an app to directly access the weather from your weather station on your phone, tablet, or computer; as some other weather station companies do and you are limited to looking at the console to see your weather data if you do not set something up on an external site. There is also no way to ‘log into’ or connect directly to the station. So I highly recommend setting up an account on one of these services. It is pretty easy, free, and I don’t think I need to go into the instructions here. The Logia manual has a bit more info about this if needed.
So if you want to be able to access your weather data on other devices you may want to sign up on Weather Underground and/or Weathercloud so that you can either use their websites and/or the Weather Underground app (Weathercloud does not have an app but all data can be accessed via their website).
I suppose this weather station could be used without the Internet or a WiFi network if you just wanted to use the standalone display, or had it in a remote location without Internet or WiFi.
You may have to press the Wi-Fi/Sensor button for six seconds to enter “AP” mode – which flashes on the screen in place of the WiFi icon when it is in this mode.
On the device you are going to use to set the station up – whether this is a computer, Android, or iPhone; you need to go into your WiFi settings and search for and find the weather station’s SSID. It will be in the format of “PWS-XXXXXXX”. Once you see it connect to it, give it a few moments. Of note – the Logia Weather Station only uses 2.4 WiFi.
Now open a browser, doesn’t matter which one – and enter “http://192.168.1.1”. Enter it exactly like that.
Now you should see the setup screen. 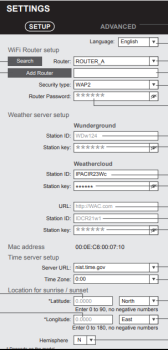
Most of this is pretty straightforward and the instruction booklet (you can also get it in PDF form here) will give you a little more info. Basically, you are entering your WIFI’s SSID (from a list or manually), password, your WeatherUnderground and/or WeatherCloud info if you have it (it’s not required – but otherwise you can only access weather data via the console display), your time zone and Latitude and Longitude (go to Google Maps and right click on your location – it will be at the top). If you are in the Southern Hemisphere you also have to designate that in the settings here.
Across the top is also an advanced tab, which you normally won’t need to mess with unless you have specific calibrations to the sensors that you need to do for some reason. If that means nothing to you then you don’t need to worry about it. This screen also allows you to update the firmware, it shows the current firmware version and has a upload field. I have not found any place on Logia’s website to show any firmware updates.
Once you have everything set click APPLY and the device that you are connected to the station with should disconnect and pick up your regular WiFi. Let everything sync, which may or may not take a while and after a bit, everything should (keeping fingers crossed) start slowly working.
If you have any troubles try pressing the Wi-Fi-SENSOR button once for it to enter pairing mode. For future reference – you must do this when replacing any of the batteries in any of the parts.
If nothing works try the RESET button (on the back) – pressing once does a quick reset. If you get really stuck – well, you may have to hold down the RESET button for a factory reset and set the whole thing up again.
After having the weather station running for a bit I found that I wanted to change the location of the outdoor sensor and also add the settings for the WeatherCloud account, which I didn’t initially do. Holding down the Wi-Fi/Sensor button for six seconds is supposed to put it into AP mode, I believe I messed this up and ended up having to reset the whole system instead of just being able to go back into the setup interface. Likely my mistake, and not the weather station’s but if you get really totally stuck you may have to do a full reset.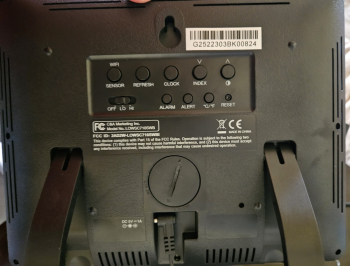
I see some reviews from people who seemed to have trouble setting things up, but I think this is on par with many people’s inability to set up technical things. The Logia 7-in-1 Wi-Fi Weather Station is, I suppose, not the easiest to set up for a person who doesn’t know too much about tech, their network or WiFi and/or have issues with using technology, but for the rest of us it should be an easy setup.
Once everything is working you should see all stats on the display, and the front buttons should allow you to step through various displays.
To look at your weather data online you can either go to the WeatherUnderground website and enter your weather station’s ID in the search bar or use the WeatherUnderound app and use the search bar (you can save your weather station as a favorite for quicker access) or go to your WeatherCloud account.
You can see any and all data for the current day or any day, week, or month beginning from the first of the year (or whenever you first set your station up) in graph and table form. Very nice.
Unfortunately, WeatherUnderground does not give you any way to save or dump or export your data to your computer. Perhaps their subscription service does.
WeatherCloud is very similar in data display, but with the difference being that you can save a year’s worth of data to your computer – in month-long chunks in .CSV form, ready to be imported into any spreadsheet. For you data- and weather-nuts this is a wealth of super-yummy data dumps, or if you just want to do some tracking and stat watching over a period of time, or want to process the data in another weather analysis program. Really, the uses are endless if you are a weather enthusiast.
WeatherCloud also has some nice Reports, Plots, etc on their website, some of which you can dump to PDF form.
The console itself holds memory for a month of data, which you can access via the console’s buttons. And of course it displays all relevant info in a very readable, easy-to-see form. It also includes a hyper-local simple forecast for your immediate area, you’ll find this pretty accurate (the manual says 70%to75%, which I agree with generally) and useful I think, keeping in mind that – depending on where you live – this is specifically for your little piece of the world, many times not quite the same as other more general forecasts.
It also has weather alerts. This includes high/low indoor and outdoor temperatures, humidity warnings, high wind speed warnings, extreme barometric drops, high heat index, low wind chill, and high or low dew point.
The data you receive from the outside unit is outside temperature, outside humidity, barometric pressure, wind speed, wind direction, rainfall, and sun intensity.
The console shows all of the following with historical and high low temps over 24 hours, plus alerts for highs and lows for any of the following: indoor and outdoor temperatures (in Celsius or Fahrenheit) with ‘feels like’, dew point, heat index, wind chill, and temperature trends; humidity; wind speed and direction (with a direction display gauge, which can display average or gusts); rainfall with rain rate; UV Index/sunburn time, light intensity (in watts/m2 solar intensity), barometric pressure (in the common measurement units). The console also has a clock with alarm, moon phase, indoor comfort display, and sunrise/sunset time.
The transmission interval is between very 12 seconds and 24 seconds, depending on the data.
The rain gauge is said to be accurate to about .01 inches maybe, and automatically empties so no messing with it is needed. It can also be cleaned if gunk gets into it.
The max wind speed it is rated at is 99 mph and the unit has a broad operating range for temperature and conditions. I think it should be fine under most fairly extreme conditions, but in the event of tornados and hurricanes and ice storms and things like that – I perhaps would consider taking it down and storing it somewhere safe if I had time to do so.
There are some optional sensors and a lightning sensor that can be added, and any sensor including the main unit can be replaced.
Mine has worked perfectly under high winds and extremely low temperatures, both of which we get here.
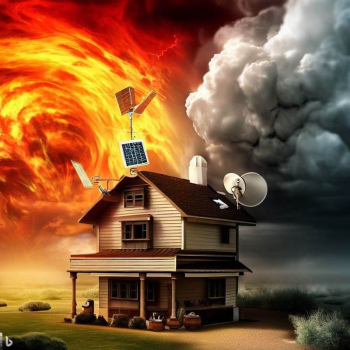 One of the things that bugs me about these weather stations in general – any of the moderately priced ones – is that the outdoor sensors all seem to have a certain maximum lifetime before they have to be replaced. This is not specific to Logia but seems to be across a range of these weather stations and if you dig enough it comes direct from the manufacturers, as well as from reviews I have seen. I guess that between the fact that the outdoor sensors are constantly exposed to extreme conditions as well as daily conditions, as well as the sad state of the durability of electronics in general – you have to factor in the replacement of the sensor at some indeterminate time in the future or a replacement or upgrade of the whole station. So it is maybe important to find a reputable company that is going to be around when you need to buy a new outdoor sensor, unless you just plan on buying a whole new weather station setup. Which in some cases might be just as desirable. Logia seems like a pretty reputable company, and while it hasn’t been around for a long period of time it seems like they are selling a lot of units.
I’ve been comparing the various sensor outputs to other devices I have at my home, as well as nearby weather stations – both amateur stations shown on WeatherUnderground and WeatherCloud, as well as official ones. The Logia 7-in-1 Wi-Fi Weather Station seems to be very favorable in comparison to other devices and nearby weather stations, the exception to this seems to be a local official weather station and wind speed. Wind speed with nearby amateur weather stations is nearly the same, but the ‘official’ wind speed from a reporting station a short distance away is always higher, as is the generic forecast from sites like the Weather Channel. I suspect that partially this has to do with the location of the official weather station (at an airport surrounded by open fields and runways, at the foot of a plateau), and a factor in this also somewhat having to do with the places where we mount our weather sensors, usually somewhat near a house or structure or obstructions because it is convenient.
One thing to keep in mind is that this weather station does not work in any way with Amazon’s Alexa or Google Home, without using a roundabout way or apps (of which I have yet to find a satisfactory way hack to do).
Speaking of hacks – I wanted to grab the data to display in real-time or near enough real-time on my webcam site, but since there is no way to directly access the data from the weather station itself, I had to find a way to access it via WeatherUnderground. I eventually found a nice group of API scripts from the MRE Software site, last updated in 2021. But these files still work, though I had to do some modifying of the code to fit my purposes and do a few things I needed that the scripts didn’t quite cover. It was pretty easy to work with and now I have a nice WordPress-compatible widget for displaying real-time weather on my site. Thanks to the MRE Software site author.
So a very few con’s.
It would have been nice for there to be a Logia app, but the WeatherUnderound app works extremely well so I guess this isn’t really a negative.
Additionally, I would have liked to be able to directly access the data on the console for easily piping out the data to my webcam/weather website via a USB cable or other interface, as well as maybe being able to log in to the weather station via the home network – but being able to directly access this info via an API into WeatherUnderground negates this issue too, so I guess that’s not really a con either.
The wind speed does seem low despite it corresponding to nearby amateur weather stations favorably. So I am on the fence about this, as I can’t really directly measure this without using another anemometer specifically right at my location, not checking one miles away where it can be different. Eyeing my wind sock seems to show, from a guessing standpoint, that it is about right or at least close.
So, to wrap it all up here – all in all, I am extremely happy with the Logia 7-in-1 Wi-Fi Weather Station with Solar., it seems accurate and is moderately easy to set up and get going with very few negatives, and works nicely. We’ll see about durability over time, of which I will post about as needed.









Interesting article on a low cost weather station. Some things you should know… First the update interval of 12 to 24 seconds means if there is a gust of wind or a sudden change, you won’t see it if it falls outside that interval. There are similarly priced stations that have a quicker update time. Second, the known and reported distance between the outside station and the console is much less with users reporting about 150 feet at best. Third, accuracy reports by users are much less than advertised. Fourth, this is not made by Logia but a company in China and the same station can be found under several different names on discount sellers like Wish and Temu. Support has been a problem. Finally you say that if there is a tornado or hurricane or an ice storm it should be taken down and stored in a safe place… Hahahaha… if a weather station isn’t made to take conditions like that it is cheap junk. You describe how to connect it to WU to report conditions but during bad conditions you say to take it down??? Then what’s the sense of connecting it to WU ? You might want to look at an Accurite or a Davis weather stations as more accurate and durable and made by the OEM.
I have to disagree with most of what you say. This is a moderately priced unit, it’s not an expensive one nor a processional one and it’s certainly not going to be as good as higher priced ones.
As to the timing interval – again, you would have to pay more for similar features but in reality if there are extreme windy conditions and there is a wind gust that falls within the update interval then likely there is going to be another one coming along, and another, and another.
Mine is around 250 feet away from the base now, as I moved it out to my chickenhouse barn. It works just fine, can’t say how much more range it has.
If you read my review you’ll see that I mention that it obviously isn’t made by them, but that’s pretty typical of cheaper electronics, no big deal there.
About extreme conditions – I 100% stand by the idea of taking down the weather station no matter which unit you have or how much you paid for it. Unless you don’t give a crap about it and want to take the chance of it surviving.
Power lines, power poles and cell towers and houses and buildings are taken down by hurricanes, ice storms, tornados and such and the only weather reporting units that can withstand direct hits by extreme weather conditions would be professional quality units fully armored.