 For this review I am testing, evaluating, and reviewing the Amcrest 1080P WiFi or Wired Smart Security Camera Model ASH22-W.
I’ve been a little behind on cameras of this type as I have been using cameras connected to surplus computers, which do double duty with serving up still photos for a Jefferson County, NY weather webcam. You can read my post on using an old computer as webcam server.
The Amcrest ASH22-W camera has a relatively economical price yet has a lot of features listed under its specs, so I was excited to give it a try.
Packaging is typical – packed well in cardboard forms and foam padding with all items in their own little baggies, the lens on the camera is protected with a plastic film, and one piece of sealing tape is all that is needed to open the box.
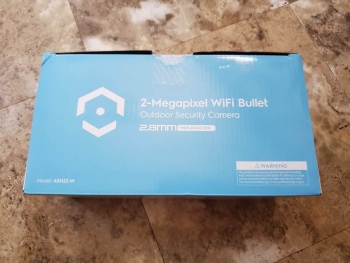
The box lists the title and a few features and looks very well-printed, with photos of the camera and other promo stuff printed on it.
Included is the camera, a paper template for drilling mounting holes, the USB cable and power blister, mounting screws and anchors, a quick start guide, warranty info (you receive a full one year warranty with this device), some WiFi compliance info, data on cloud storage and the Amcrest user community, a firmware and FCC regulatory info guide, and a manual.
The manual is a simple piece of slick folded-up paper and covers the basics. Like so many things you don’t need much of a manual as everything is done through the app and help is available online in the app if needed. You probably won’t need it – it is a breeze to set up; whether using WiFi or wired networking.
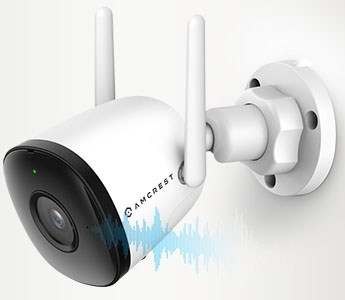
The camera is a fairly standard normal-looking security camera with two antennas, an indicator light (which can be turned off in the app), a built-in microphone, a swiveling mount – it’s very recognizable as a security camera which can be important in itself; to scare away burglars and others. It seems very well-sealed against the elements, and the cable; which exits the camera through the mount, is sealed as far up into the device in the back as I can see so the mount itself does not need to be weather-sealed to protect the integrity of the cables and electronics inside the camera.There are three mounting holes, and the included screws work just fine with a Phillips head screwdriver and maybe some pre-drilling. Anchors are included but I did not use them and they are more for indoor use. The mount is very secure, of a nice thick plastic with substantial holes for the screws.
The cable is a bit thick as it holds both the power and the network pigtail and is heavy-duty, it splits at the end into the power plug as well as a network cable plug, and the junctions are well-sealed with thick joints. The mount has a slot for the cable to worm it’s way out so you can either hide the hole the cable is going through by drilling a hole in the center of where the mount will go, to snake it out the side and down into another hole as needed (like you see in my pic). The length of the cable before it splits into the two pigtails is short but plenty long enough to reach any normal distance to an accompanying hole or access that you would need, I think. Unfortunately, the network end and power plug end are not detachable from the rest of the cable so if you need to drill a hole it does have to be the diameter of the network end part, even if you don’t use that part.The camera mount gimbals easily at any regular normal angle that you would need and once you get it right the gimballed part tightens for a secure lock. The camera housing is IP67 – which means it is VERY weatherproof and wind-proof. Weight is about half-pound or so and size is 5.8 x 2.9 x 2.9 inches. There are two WiFi antennas that can be repositioned as needed, and as mentioned above the camera can be gimbaled in any direction or orientation.
Once you plug the power cable pigtail into the power cable and in turn plug this into the USB blister transformer it should start booting up. Setting up is very slick, well-polished, and in many ways similar to other things like this, including the Ring devices. It’s easy enough for almost anyone to do, of any technical knowledge (or lack thereof).
Set up is done via the app, for Android or for Apple devices.
As I said – it’s simple; you install the app through your app store, open it and register an Amcrest account, check your email and enter the verification code that you were sent, log in and then go in and add your device – scan its QR code in the app or enter it’s serial number manually. Then follow along with the directions in the app, which is a fairly short process.
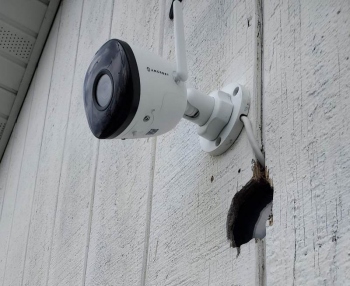
Mounted on garage, above the weather webcam
To connect this camera to your network you can either use WiFi or connect the camera directly to a network cable. Whether you use WiFi or connect a network cable you do have to plug the camera into a power source, a USB cable and transformer blister are included as I mentioned.
For WiFi you are asked to connect your mobile device to the camera’s temporary WiFi network, and follow the instructions in the app to continue, finding your own Wi-Fi network and entering its password. Once that’s done you are all set.
With the Wi-Fi setup it worked okay for me, considering the distance the camera is from the house. It was fine but even with the two antennas it was a bit far to reach across a long yard, through a car, and then through two feet of the solid limestone that the old section of our house is made up of. For normal situations I think the WiFi is just fine – having tested it with a router I had in the garage where this is installed. BTW, the camera only uses 2.4 GHz WiFi and does not have 5 GHz capability.
For connecting directly to your network via a standard network cable you pick that option in the SmartHome app (which also allows you to connect to any additional Amcrest’s other smart home devices – of which they have many) and follow the directions there, the process of which is even easier than WiFi – though of course you have to plug your network cable into the camera.
Video signal is via dual H.265 / H.264 and WiFi uses standard AES/WPA2 encryption that most of us have on our WiFi networks.
The network cable can be plugged directly into the pigtail but there is a whole waterproofed clamping section, it can be a little complicated but with a little common sense it can be worked out. There is a foam seal and a part that screws onto the camera’s pigtail to make everything relatively waterproof. Once done you have a nice water-resistant network cable junction in the pigtail leading to where ever your network cable goes.
So as I mentioned above I am using the network cable instead of WiFi, which was an easy matter as I already had a router set up with DD-WRT configured as an access point and this was right inside a short distance from where the camera is mounted.
If you set the camera up on WiFi and then decided to use the wired network connection instead the camera seems to have to be deleted from the app to do this, and you just need to add the device again with this time selecting the wired solution. I did a hard reset of the device itself using the little reset button on the bottom of the camera (which extends through the waterproof hatch that contains the SD card), though I tried this again and didn’t need to do a full reset, just a soft reset. Setting it up again is about the same procedure but you pick ethernet instead of the Wi-Fi and you don’t need to go through the whole password and connecting to the camera etc, as I mentioned above.
I really liked the easy setup and as I mentioned the setup is slick and smooth, and very similar to other security cams including the Ring series. All options are simple to access via the gear icon for the device – like sensitivity, human detection, and zones. The sensitivity is indeed very sensitive so I had to crank the sensitivity down significantly. And human detection worked amazingly well. Setting up zones is easy – these are zones where you want motion detection thus eliminating other zones where you do not. Pretty standard stuff for surveillance/security cameras.
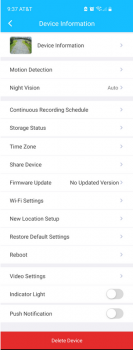
Notifications work nicely in the app, allowing you to quickly view the video of the notification period as well as quick access to real-time video via the stored video on the SD card. You can also be notified via computer as well as when the camera goes offline, there are tons of more options with some of the software that Amcrest provides free of charge, including recording to computer and live streaming on the computer, etc. More about that later.Various other options are available in the app – like the ability to reboot the camera, do firmware updates, share the device with others, adjust video quality, notifications, turning the indicator light on and off, and more.
You can also set up a continuous recording schedule in addition to the motion detection saves, which I have set up to save to the SD card. You can use an SD card up to 256 GB and Class 10 or higher is recommended. The SD card physically is accessed via a small door on the bottom of the camera, secured with two small screws inside the waterproof hatch. The hatch also contains the reset switch, which protrudes through a hole.
You can also pay for cloud recording from Amcrest, which uses Amazon AWS for security.
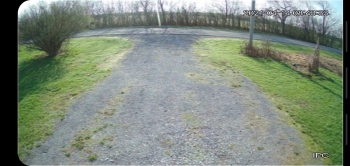
You can access previously saved motion detection video or recorded video on the SD card, through the desktop software DVR, or through the cloud service right through the app, from where ever you are.Video quality is fine, it’s not extraordinary but it is in HD and of moderate quality.
In addition to day recording the night vision works particularly well also, the IR LEDs reach around 98 feet or so and consist of two LEDs. I’m really impressed with the night vision. I can even see night bugs flying back and forth in front of the camera lens.
The camera itself has a 2.8 mm lens with 102 degrees of view, which is pretty wide, and is an HD 2-MP lens with a resolution maximum of 1920×1080 at 30fps, you can also use 720P. This allows a certain amount of digital zoom and such. Operating temperature is around -20 degrees below zero and 140 above – so direct sunlight shouldn’t bother it and local winters here in Northern New York won’t affect the electronics.
There is a built-in microphone that lets you listen to what is going on at the camera. In my experience, this worked well and I was able to hear even fairly low-volume things going on nearby, though passing vehicles were super-loud. There is no speaker.
You can also use this camera with Amazon’s Echo Show and some other smart home systems, though not Google Home.
Amcrest also has an impressive amount of free software to download for surveillance, set up, etc. The app has quite a few options, the normal stuff for using your camera, but the software you can download to your computer gives you immense control and options over what you can do with it, including FTP’ing, saving video to your computer or an external NAS device or DVR, face recognition, and tons and tons of other things. I could write an entire review on just what you can do with this software – it is excellent and I have yet to explore very much of the massive number of features available.
So in summation; the Amcrest Security Camera Model ASH22-W works beautifully, though the camera quality itself could be a bit better. But the co-star here is the app and the functionality of everything working together seamlessly and trouble-free, and easily. It just works nicely – both the setup and the use of it.
If you were asking how good can a security camera costing $50 (as of April 2021) be – in my opinion quite good and definitely worth the price, if it is an Amcrest Security Camera Model ASH22-W at least.

