
I’m a geek, I admit it.
Since Windows 3.1 I have waited impatiently for each new version to come out. Heck, when Windows 7 was released I had been too excited to sleep very well the night before it was released. And I tried Windows 10 beta way, way before it was finished and ready for the masses, and thoroughly enjoyed it.
At least for a while – it certainly has its fair share of issues, annoyances, bugs, and problems; so I have a bit of a love/hate relationship with Windows 10, which is a story for another day.
So when I got to try Windows 11 I was looking forward to (hopefully some of) those annoyances being taken care of.
This posting isn’t about whether those annoyances were taken care of, or about Windows 11 in general nor the philosophies of Microsoft when it comes to Windows, or whether Windows 11 is good or bad or whatever, etc; but concentrates on one aspect – the lack of the ability to group programs in the Windows 11 Start Menu. I’m not sure exactly what went into Microsoft’s decision to eliminate the ability to group programs in the Windows Start Menu.
It’s an issue that ranges from a non-issue for many to a major annoyance for others. In some cases it’s a deal-breaker.

Example of Windows 10 Program Groups
I mean, what were they thinking? There’s a certain amount of streamlining in Windows 11 and this is likely a part of that. But for me, it seems like it is more of a dumbing-down, a subtracting of a feature that makes some of us less productive in Windows 11, and should have been an option.
So is it a deal-breaker for me, personally? No, but it is a big annoyance. There are many workarounds – some involving replacing the Start Menu with an after-market piece of software. But I’m not fond of adding more software that is running all of the time just to augment something that is already part of the system.
I did try many of these Start menu replacements and most worked extremely well, didn’t really seem to slow anything down, especially on my awesome HP Omen desktop gaming computer. But still – Windows 11 has a perfectly fine Start Menu; if it just had the ability to group programs and files.
Also, there doesn’t seem to be the ability to add shortcuts to non-programs in the Start Menu. You can’t right-click on a spreadsheet file, say, and pin it to the Start Menu. The same with things like URL shortcuts (though there is a way to roundabout trick it into pinning URL shortcuts). I miss both of these abilities too.
I got to thinking that all I needed to fix these problems was a program that the Start would access and would act as a program group.
I thought perhaps I would write one myself, but it’s been quite a few years since I have written anything significant for Windows. A few things here and there but most of my coding involves Internet-related languages so I am terribly rusty and it would take me a heck of a long time to implement exactly what I needed.
*Update 1/27/2021 – since I wrote this blog post a short time ago I found a few articles about the possibility and testing to bring this ability back to Windows in Windows 11 Start Menu as shown and discussed in this article. To this blog post may eventually (it looks like it will be a while) be somewhat moot. Though even when they bring the ability back you can still use what I have posted here if you like a fancier grouping and vertical stacks and things like that.
But thinking back to my days of using docks in Windows, like RocketDock (which, BTW, also works fine on Windows 11) – I remembered that there was a stackable program group addon. And also that the author or someone made a standalone version that could be called from a link or shortcut anywhere, including in the Start Menu. Of course, this was on Windows XP and then Windows 7.
That would do the trick though, if it were still compatible with Windows 11. The standalone could be accessed, would pop up and allow any program, data file, or link to be clicked, and once it was clicked the standalone grouping program would silently close and open the shortcut, link, or file.
It was just a matter of finding what it was called. I jumped on my home/office network and perused my backups, fortunately I have backups from a hell of a long time back and all organized and indexed. A quick keyword search for “dock” found the associated program.
The program was called StandaloneStack, once I found the name I set out to find if there was a newer version to try, since the version I had worked fine after a quick initial test- but was quite old.
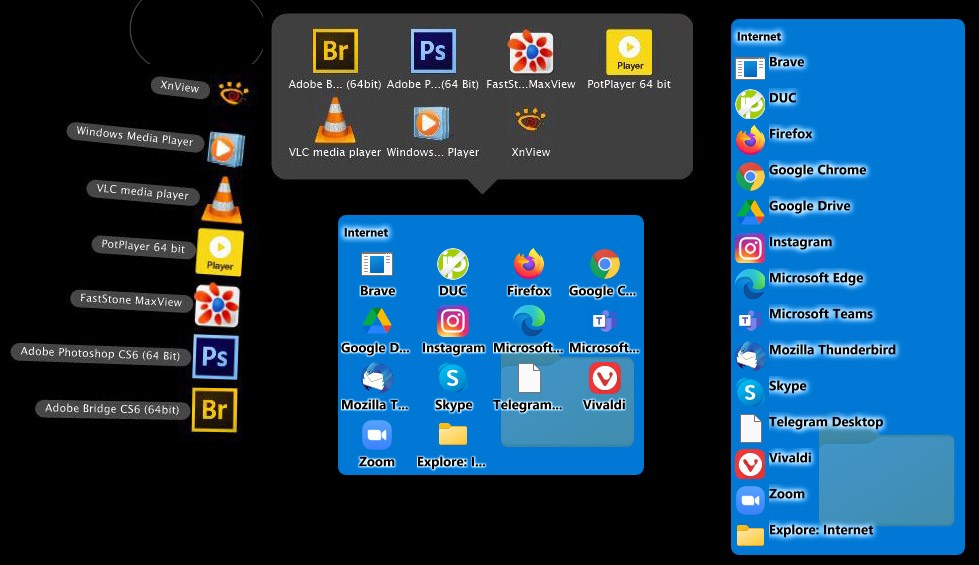
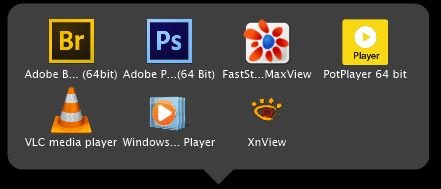
With StandaloneStack you create a ‘stack’ which pointed to a directory on your hard drive containing, well, anything and then call a shortcut to point to the StandaloneStack program which runs that particular ‘stack’ and pops out your ‘stack’ in one of two visual formats, allowing you to click whichever one you are looking for. The ‘stacks’ come in two flavors – a ‘stack’ that pops out a curving visual display of the program, file, and URL icons and a more conventional box-like ‘stack’ (called a ‘Grid’ in the program). You can see examples of both in the title top graphic as well as further down this post.
I found the author’s site right away – but there was no date on the StandaloneStack 2 website from the author, Christian Salmon. When you go to download the program it mentions Windows XP/Vista/7 so I am guessing it has not been updated in a long, LONG time and seemed to be the exact version I had from many years back.
Apparently, it was based on the original stack program that was made for RocketDock, and this author made the standalone version of it that could operate without the RocketDock program.
You can download the last version off the author’s website.
I set out and messed around with it a bit more and surprisingly it worked perfectly, and quite well. Usually, it is super-fast to pop up, once in a while it may not load quite as fast as other times. It does seem to depend on how many programs you are packing into it, especially if you are running on a slower computer. And you can always leave the ‘Keep in memory…” option turned on if you wish as it is a very small program. More about this later.
So let me take you through the process of setting it up. And keep in mind here – there are a couple of different ways of doing it, I’ll show you the way I did it but I imagine others will find other ways, tweaks, and methods of doing it.
Also, a note for the rest of this blog post – I use the terms ‘folder’ and ‘directory’ interchangeably. They are the same.
In addition, keep in mind that this program was made quite a number of years ago, and not for Windows 11 – I’ve tried it on a number of Windows 11 computers and it works fine but it’s possible it may not work for you. And it does have some idiosyncrasies when setting up the stacks – once you do have them set up it seems to work flawlessly.
Hmmmm… Since posting this I ran across another stack program, once again an older program (originally for Windows 7) but also one which still works in Windows 11 – but this one is more user-friendly and overall works better than the StandsloneStacks program in general, at least when it comes to setting it up, and it can be less laggy it seems – though you do have fewer visual options when setting it up.
The program is called 7Stacks and can be found here.
If you want to start with the process for using StandaloneStacks then continue reading. But if you want to jump down to 7Stacks click here.
Over time I have been using both and I would now recommend using #7stacks over StandaloneStacks.
Firstly download the StandaloneStack 2 program – at this link.
Scan it with an anti-virus program if you wish, but I have scanned it by a total of three antivirus programs and the files are safe.
Open the archive – either in the native Windows File Manager or Winzip or 7-zip or whatever you are using to open zipped archives. Just try to make sure you keep the integrity of the folders included in the archive, if possible. It generally runs fine without them actually, but if you want to use some of the (kind of old) features you probably want to extract the directories included in it intact.
Anyway, extract them to a place on your hard drive where you are going to access the folder and run the program to set the program groups/stacks up. As you can see in the screenshot below I put it into my Documents directory, but it will run from nearly anywhere.
But if you try to put it in Program Files or Program Files (X64) you may have some issues. It will work fine, but you must run it with administrator privileges every time you set up a stack. So I put it in Documents where it doesn’t require the user to do that each time.

Once you have extracted it to its new home in a hard drive folder/directory, you will need to create a program group or use an existing one program group (if you had created them in Windows 10, say), or point to a directory on your hard drive of some type.
You can point to a directory anywhere on your computer, including directories of files that may change as needed. These will update dynamically (as long as you don’t have the “Keep in memory when stack is closed…” option selected – see below). Very handy and useful, especially if you are working with changing files – no matter what type they are, as long as they have an association in Windows.
For this example though, I am going to create a more static directory to hold shortcuts, right in the original Windows Start Menu program groups.
I did have leftover program groups from upgrading from Windows 10 to Windows 11 that still resided in the Windows directory structure, even though Windows 11 Start Menu can not access these as groups, nor can it search for them specifically nor, seemingly, do anything else with them – even though they are still there. Windows 11 can access anything in these groups of course.
These groups also can be made up of various installation’s automatic install procedures which create program groups in the Start Menu. Again, Windows 11 doesn’t let you see these groups, just the individual programs inside them, via the Start Menu search.
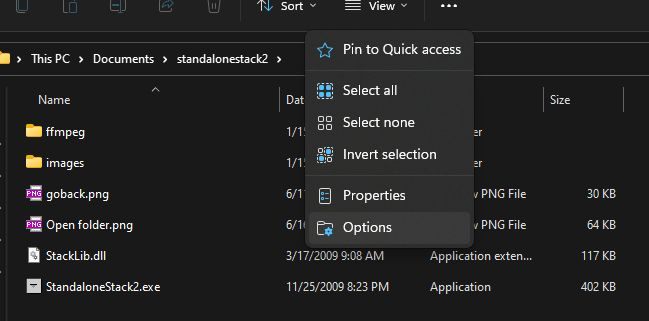
Your Start Menu items are actually stored in a couple of different places. Of note here – you may not be able to see the Start menu directory in File Explorer unless you turn on File Explorer’s options for showing hidden system directories and files. Find these options by clicking the three dots in File Manager up near the middle top, and then select Options and then the second tab – View. Then select ‘Show hidden files, folders, or drives.

So if you are going to point your stack to something besides a Start Menu group then you can skip ahead a bit.
If you are following along my example then continue on – to find your Start Menu locations they are as follows (and there are indeed two locations):
C:\Users\%Username%\AppData\Roaming\Microsoft\Windows\Start Menu\ – These are the Start Menu programs that are installed for specific users, where %Username% is the name of the user account you are currently using.
C:\ProgramData\Microsoft\Windows\Start Menu\ – These are the programs installed for all users.
A note here – you may think that you can copy programs from the windows apps shell folder but this does not work for the Stack program. It just does not have the ability to access these formats of shortcuts. Anything copied from the windows apps shell folder (which you can access via Run dialog [WINKEY + R] and then typing shell:AppsFolder) can not be accessed in the stack.
So organizing grouping by hand in the Start Menu directories directly can be a little challenging if you are not familiar with how Windows does this, but basically what I did was pick one of these above locations to create my groups and also to use some of my existing grouping left-over from Windows 10, but for this example, I am just creating a new group. Again, if you already had your stuff grouped pretty well in Windows 10 it should still be distributed in groups in the above directories.
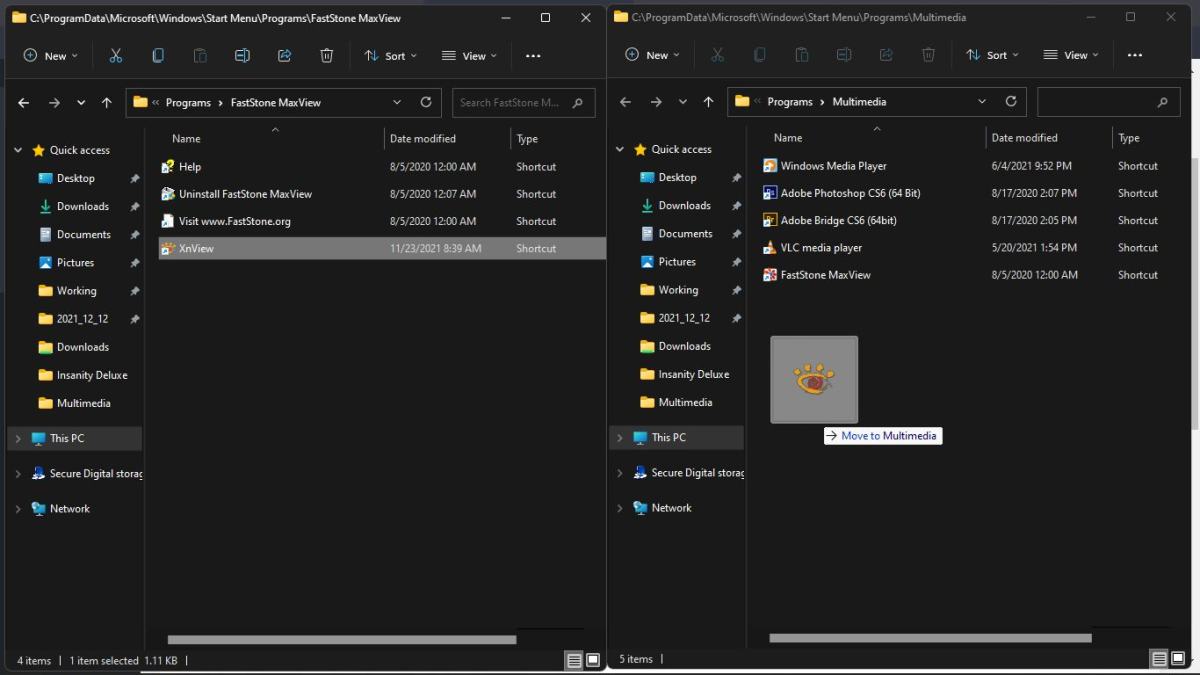
I picked C:\ProgramData\Microsoft\Windows\Start Menu\Programs as the place to create my example grouping.
Here you can see I created a Multimedia group. Just right-click somewhere in the right pane of File Manager and select “New” and then “Folder” and name it what you wish.

Now just start copying or moving shortcuts into it, if you are following along the example then you want to move shortcuts from other places in your Start Menu to this Multimedia directory.
To do things more efficiently and quickly I opened multiple File Manager windows; one being the Multimedia directory I just created, another File Manager showing ‘C:\ProgramData\Microsoft\Windows\Start Menu\Programs’ directory, and another File Manager showing the ‘C:\Users\%Username%\AppData\Roaming\Microsoft\Windows\Start Menu\Programs’ directory.
Next I copied/dragged all files from each open Start Menu directory file manager window into the Multimedia directory in the other open File Manager window.
You will likely need to open and close and peruse various directories in each File Manager Window to find the shortcuts you want. It may take a little searching around to find everything, and you may possibly even need to create new shortcuts in your Multimedia directory File Manager window if you can’t find something; by going directly to a program’s install folder and creating a shortcut and dragging it over.
You of course can try a few here and then go back and add more as needed later if you wish. Also, to re-iterate – you can also add shortcuts to files of pretty much any type, or webpage URL’s, batch files, etc. Whatever – they will run in a stack.
Once you have your directory (in my case the Multimedia directory) filled with the programs that you want you are ready to set up a group, or ‘stack’.
Now go to where you extracted your StandaloneStacks directory, in my case it was in the Documents directory. Open up “StandaloneStack2.exe”.
Note here; in my screenshot below the directory shows a ‘standalonestack.ini’ in the list – if you have not run the program yet this will not be shown. And an additional note for later – you can manually edit this INI file with a text editor to change options by hand. I’ll get to some more about that later.

Once it has loaded go down to “Options” and unclick “Keep in memory when stack is closed…”
You could leave this checked, if you have any modern computer it will be fine running in the background for faster speed, though if you do notice any annoying slow-downs in the stacks opening you could keep this one as it is a very small program. But it loads pretty fast anyway, at least on my computer, so I feel that this is unnecessary. You can always change it later for each individual stack or for all.
A note here, I am skipping over the other default options here. You can go back and set these as needed, now or later, and you can set the same options individually for each stack you create also. So the defaults will be carried over when you create a new stack, yet you can edit each stack’s options individually as needed, whenever you wish; by selecting the “Overide default Setting” option at the top of each stack. Yes, ‘Overide’ is spelled wrong 😉

Now, go down to “New Stack”.
Name your stack beside “Stack name:”. This will show up under the “My Stacks” each time you load the StandaloneStack2.exe, for editing and tweaking and will be the name of your stack in the Windows 11 Start Menu (though you can rename it there if you wish). Unfortunately, you can not rename it in the StandaloneStack program itself once you create it.
BUT, you can use a text editor to open ‘standalonestack.ini” itself and edit any instances of the name there (there will likely be multiple instances of that stack name). In fact, you can manually edit any options right in the INI file instead of using the program, or in addition to it.
Next click the three dots beside “Path:” and navigate to the directory that contains the group/stack you want to create. In my case it was ‘C:\ProgramData\Microsoft\Windows\Start Menu\Programs\Multimedia’.

I selected ‘Grid’ as the visual display of the group but there is also ‘Stack’ (the default). Below are examples of both – and you can also have a Stack automatically change to a Grid depending on how many files are in the directory.
Now you can mess with the settings or leave them as-is for now, you can always go back and edit them by re-running ‘standalinestack2.exe’. Once ready click the “Create Stack” button.
Now you are ready to save the stack in a place where you can designate Windows 11 to pint it to the Start Menu.
Click the “Create shortcut” button and save it somewhere like the desktop. On my computers, I could not save it directly to the Start Menu directory, due to a Windows security message, so I saved it to the Desktop first, then moved it to either ‘C:\ProgramData\Microsoft\Windows\Start Menu\Programs’ or ‘C:\Users\%%Username%%\AppData\Roaming\Microsoft\Windows\Start Menu\Programs’. It doesn’t seem to matter which place you save it, though if you have multiple users you may want to save it in the ProgramData directory if you want everyone to have access to it.
If you want to be able to save it directly to the Start Menu without saving it somewhere, like the Desktop, first then you can run ‘StandaloneStack2.exe’ with Administrator privileges instead of just clicking on it (right-click on ‘StandaloneStack2.exe’ and select “Run as administrator”).
Once you have the stack in your Start Menu right-click on it and select ‘Pin to Start Menu’.
You should be all set. Now click your Start Menu and you should be able to find the stack you created. Give it a try, and also drag it to where you want it to show up in your Start Menu.
Here are examples of the Stack layout and the Grid Layout.
Stack Layout
Grid Layout
One idiosyncrasy here is the Stack layout didn’t always display the entire group because it unrolled up past the screen edge, so you may have to mess with the offset and such.
I like the Grid Stack layout much better, and the Grid also doesn’t have the above issue. The problem here is an issue that you have to watch for when setting up your stacks – changing options sometimes isn’t reflected immediately. And sometimes you have to delete the stack in the place where you saved it and recreate it. As I said – this location problem doesn’t crop up with the Grid layout, though you can change its pop-out location too.
And sometimes things just are stubbornly not working. You may have to reset Windows 11 worst-case scenario, and if that doesn’t work delete a stack and create a new one. Like I said – worst-case scenario, mostly you won’t run into these issues.
[widget id=”custom_html-7″]
Now you can go back to the ‘StandaloneStack2.exe’ and mess around with the other settings. As I said above – sometimes you may find that your settings are not making any changes so you may have to delete the Stack you created in your Start Menu and re-save it in StandaloneStack2. Worst-case scenario if nothing else works or a stack is not working right at all delete the stack directly in StandaloneStack2 and create a new one, though first trying resetting Windows 11.
Most of the settings are self-explanatory.
Now that you have things set up and (hopefully) working you can try tweaking some of the settings in StandaloneStack2. Open the program again and edit your various settings under any or all of the categories of settings for the stack you are working on, and then click the “Ok” button. If you do not click it the program does not write the settings. Once you do you can click the stacks you created in your Start Menu and see what the changes have done.
One setting of interest may be ‘Show “Show in Explorer”‘. This can be nice if you are working with a bunch of data files of some sort; graphics, photos, spreadsheet, etc and will want to have their directory open in File Explorer rather than clicking its stack on the Start Menu over and over. But it also makes adding new shortcuts much easier. When you want to add a new shortcut or file just click the stack you want to add something to and click ‘Explore…” and then drag and drop your shortcut, link, or file into that Explorer window from where ever it is originating from. For example, to add a newly installed program shortcut click Start Menu and find the new shortcut, either under “Recommended…”, “Most Used…”, “Recently Opened…” or by starting to type the name of the new program in the search bar at the top of the Start Menu. When you find it right-click on it and select “Open File Location”. Drag (or copy or cut) its shortcut from that explorer window into the Explorer windows you opened for the stack group. Violà – the shortcut is added.
You can also assign a nice icon to each stack that you created. Go into ‘C:\ProgramData\Microsoft\Windows\Start Menu\Programs’ or where ever you have saved your stacks. Right-click and select Properties, and then click the “Change Icon” near the bottom of the Properties dialog. Now you can browse to an EXE file, ICO, DLL, or .ICL file and select an icon to use. This can be pretty much any program on your hard drive, including one from the program category that you are editing. For example – if you have a Multimedia Stack you might navigate to Photoshop’s directory, find the EXE for it, and select an icon from that to represent that stack’s image.
Unfortunately, you can not directly use a graphic in JPG or another format without converting it first.
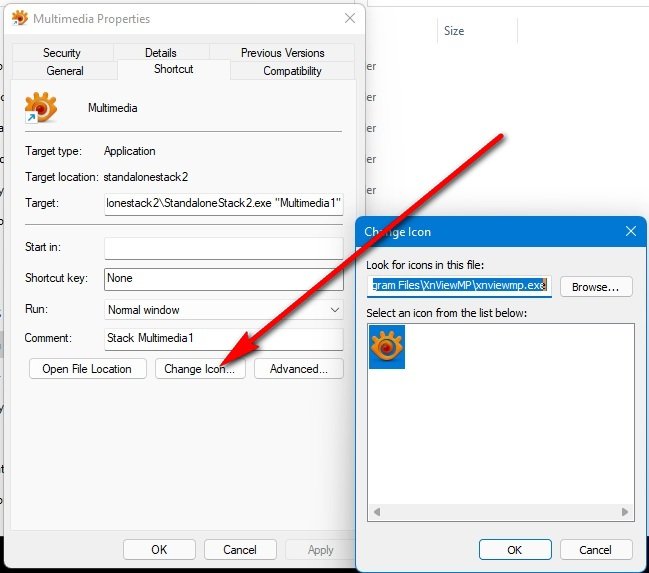
You can convert any graphic to an .ico file using a site like Convertio’s JPG to ICO online converter. Just convert your image, stash the ICO somewhere and navigate to it in the above dialog.
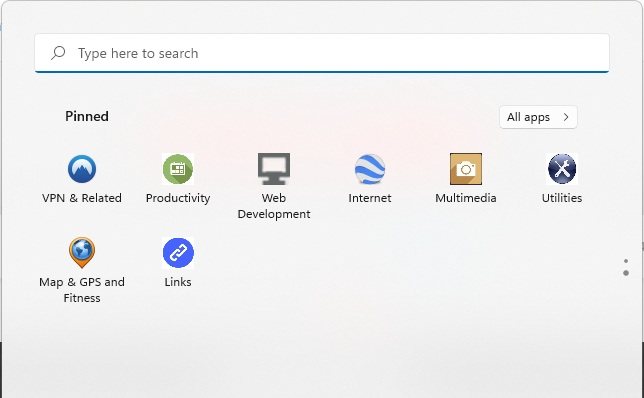
Here is what some of my stacks look like after adding icons to each one. For this example, I used a mixture of graphic images converted to ICO’s and icons taken directly from various programs that are included in the stacks.
For example, I used the NordVPN icon for the ‘VPN & Related’ stack.
Another thing that I want to reiterate is that there are different variations of setting this up which will work fine. And also to note, again, that this gives you back – in a way – the ability to add files and links to the Start menu in addition to program shortcuts. Create URL links, access files, directories that change, etc. Pretty much anything. You now have the ability to do those things in Windows 11.
I imagine somewhere there may be something else similar to this, maybe even something that works better and/or is more modern, and perhaps someone will even create something better than this that is not a complete Start Menu replacement. But for now, this works well once you get used to its little tricks and ins and outs.
So there you go – a roundabout way of adding grouping to your Windows 11 Start Menu. It may seem a bit complicated at first, and you may have to mess around with things a bit, but once you set a few stacks up and get the settings the way you want them it will seem pretty straightforward and once the stacks are set up they seem to work flawlessly.
As time goes on I will tweak this post a bit here and there, and if you have any questions or helpful suggestions and tweaks please post in the comments.
As mentioned above, since creating this post I ran across another stack program, once again an older but also one which still works – this one is more user-friendly and overall works better than the StandsloneStacks program in general, at least when it comes to setting it up, and it can be less laggy it seems – though you do have fewer visual options when setting it up.
The program is called 7Stacks and can be found here and is another free Stack program, created by Alastria software.
Download it over in the link to the right on that page (where it says Download7stacks). Unzip it and use the install program. The nice thing about this is it is a real install so Windows 11 is going to be a lot less finicky when it comes to the stacks running programs. It also creates a nice shortcut to run it, right in your Start Menu.
Now you need to create a program group or use an existing folder/directory or group, just the same as the instructions for StandaloneStacks. The nice thing with 7Stacks is you may have fewer problems setting up a group directory in other places on your computer, less of a security finicky-ness. So either create a group like the instructions show above, for StandaloneStacks or just use a directory elsewhere, whichever you please will work.
Now you can run 7Stacks from the Start menu and you will get the below dialog screen:

Unlike with StandaloneStacks there is no memory-resident option, but where StandaloneStacks USUALLY loads a stack quickly, occasionally it is a bit laggy and 7Stacks does not seem to be under normal circumstances, though I did notice that on a really old computer (that Windows 11 did not officially support running on) while just booted or doing other disk operations and such that it could be somewhat more laggy.
As you can see, for “Folder to use for stack:” in my example I used the program groups that I set up in the Start Menu, for StandaloneStacks. You can navigate to a place using the three dots, press the SF button beside them for common places, or just manually type or paste a hard drive location in here. It can be pretty much anything.
Next is your “Caption:”, what your stack to be called. Under ‘Icon’ you can click the three dots and it will give you Windows’ default icon pack, or your can Browse from that screen.
If you browse it is similar to what I covered for StandaloneStacks – you can use any program, DLL, ICO file but not a graphic directly without converting it first. For more info see what I covered about adding icons in the heading ‘Tweaking and Settings’ for StandaloneStacks.
The other settings under this are pretty self-explanatory.
Of particular note – ‘Show “Explore” item’ gives you the ability to open a stack in Explorer via an icon right in the stack. This can be useful when working with various types of files, images, etc. But it also makes adding new shortcuts much easier. When you want to add a new shortcut or file just click the stack you want to add something to and click ‘Explore…” and then drag and drop your shortcut, link, or file into that Explorer window from where ever it is originating from. For example, to add a newly installed program shortcut click Start Menu and find the new shortcut, either under “Recommended…”, “Most Used…”, “Recently Opened…” or by starting to type the name of the new program in the search bar at the top of the Start Menu. When you find it right-click on it and select “Open File Location”. Drag (or copy or cut) its shortcut from that explorer window into the Explorer windows you opened for the stack group. Violà – the shortcut is added.
‘Browse subfolders’ gives you the options to open sub-folders as another pop-up stack, ‘Hide file extensions’ is nice if you are accessing a directory with individual files rather than shortcuts and you don’t want extensions shown, and ‘Display thumbnails’ will show preview thumbnails of image files and such if that is what you are referencing as a folder/directory.
Icon size and Font size are pretty easy to figure out. The default seems consistent with Windows 11 Start Menu for me.
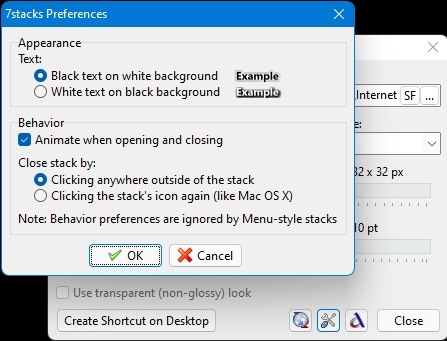
The small buttons beside the CLOSE button (bottom-right of the 7Stacks Window) are; from left to right – update check, appearance/behavior settings (see screenshot below), and About. As you can see the Appearance and Behavior dialog is pretty simple and straightforward too. This is where StandaloneStacks may beat 7Stacks in the options for visual settings.
If you notice it is lagging on an older computer make sure the ‘Animate when opening and closing’ is turned off.
Back on the main program screen ‘Stack Type’ allows a few different options. 1) A vertical Stack, like StandaloneStack’s regular Stack option. 2) A vertical stack with no text titles under the icons 3) A Grid, like StandAloneStack’s Grid 4) A grid with no text titles under the icons and 5) a regular menu-type of pop-up. The menu is reminiscent of earlier Windows versions for groups.
Your opinion may be different but I believe that the stacks don’t look as nice as StandaloneStack’s do in general, but the horizontal and vertical stacks in 7Stacks are more modern and conform better to Windows 11 visually.

Also, of note here – unlike in StandaloneStacks; you can’t adjust the position of where the Stack or Grid pop-ups – they pop up near your mouse position, or close by.
Once you have everything all set click “Create Shortcut on Desktop”.
Before you close the 7Stacks program access your desktop and give the stack a try to make sure it is the way you want it. Because once you close it, unlike with StandaloneStacks; you can not edit the stack.
Once you have it set to your perfection move the stack shortcut to where ever you want to store it permanently. I put mine in either ‘C:\ProgramData\Microsoft\Windows\Start Menu\Programs’ or ‘C:\Users\%%Username%%\AppData\Roaming\Microsoft\Windows\Start Menu\Programs’. But with 7Stacks you can actually move it wherever you please.
Once you have the stack saved wherever you are keeping it permanently, right-click on it and select ‘Pin to Start Menu’. Again, this does not have to be in either Start Menu folder like where I stored it.
Now click your Start Menu and make sure it works. You can have stacks created from both Stack programs and compare them if you wish, though they must have different names.
Additionally, you can add Microsoft apps, the ones you download via the store or may be already installed on your Windows 11. I will go over the method here – this does not seem to work correctly in StandaloneStacks.
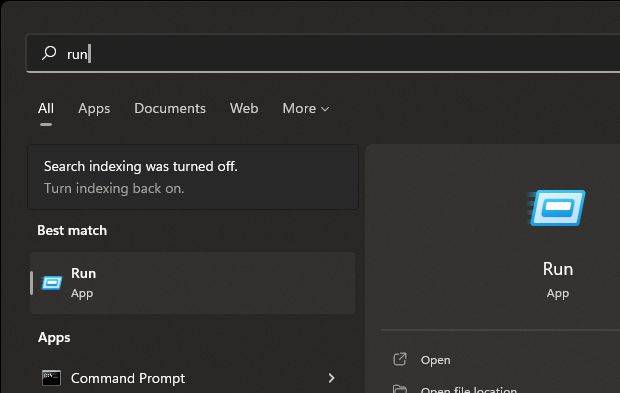
To add these apps you click your Start Menu and go up to ‘Type here to search’ or the search on your Taskbar (the big magnifying glass) for “Run”. Click Run and type in “shell:AppsFolder” and press enter. You can also just open a new file manager window and type “shell:AppsFolder” into the directory path field at the top.
Now you can find the apps that you want to add to a program group and right-click on them and select “Create Shortcut”. This will create a shortcut on your desktop (which you can of course edit the name of, like any shortcut). Then copy, move, or drag it to program the directory of your choosing, the same as with regular shortcuts.
The only real downside to 7Stacks I have found is that you have fewer options with 7Stacks than with StandaloneStacks – visually, location-wise, etc.
But as you can see 7Stacks is much easier to set up and works just as well, perhaps better.
You can also find some other alternatives to these two Stack programs here. I have not tested the other ones in Windows 11, most seem to be memory-resident ones.
StandaloneStack2 and 7Stacks are both free to download and use, from the author’s sites.


