
 During the 2020 COVID Summer, I started getting interested in mini camping stoves of all sorts, and then after a bunch of research settled on trying and researching mini camping stoves that run on readily available fuel like alcohol, drygas (like HEET), etc. versus propane or butane, or whatever.
These are tiny stoves just large enough for a small pan, cooking pot, heatable coffee mug or cup; weigh very little and can be packed easily into a backpack or even a small bag.
We do like to go camping but frankly, neither my wife nor I are interested in the very primitive camping out in the woods. A campground with no electricity at the camping spaces but a nearby shower and bathroom is great for us, and a whole day of hiking is fine but we want to be back to the campground with running water when we are done.
I wasn’t so much interested in these stoves for camping so much as I was interested in being able to make coffee, or maybe a quick soup – while hiking or mountain biking or maybe after we get back to the car after a hike.
Ya see; we always joke that we need a car coffee maker. And indeed they do make a multitude of coffee makers that run on 12 volts but I guess I wanted something more versatile, smaller, and able to be used out on the trail too but I wasn’t interested in something larger and we didn’t need something that would be able to cook a whole meal at once and/or to be large or take special fuel.
I experimented with making my own little alcohol/dry gas (which is methyl alcohol, and you usually want to get the yellow bottle though the others work fine too) stove using a tuna can. Here’s a website about it and a Youtube video – there are hundreds of sites and videos about making one and many variations, including some more elaborate and more efficient versions You basically make some holes in a tuna can and pour some alcohol in it and light it. Boom, ya got yourself a stove. Sure, there’s some more finesse to it to get enough air holes and the holes positioned just right, you’ll find some help at the link above and all over the Internet. But there’s not much to it really.
Take a look at the pictures below. In the left photo below I set the coffee pot slightly back so you can see the flame.
This brings me to an important safety note – rubbing alcohol, the kind I used which is 91%, does produce a bit of a flame. Also, this shot was on the concrete floor of my garage so you can see the flame better.
Outside it is harder to see the flame so you have to be careful when you are done/the fuel has run out and make absolutely sure that if you can’t see the flame that it is indeed out.
So I am going to sound like a broken record here but if you use drygas/HEET (in the yellow bottle) or isopropyl alcohol or rubbing alcohol that is 99% alcohol then you have to be extra, super careful, and aware as you will likely not be able to see a flame whatsoever. It is invisible. Totally.
So in the right photo, as you can see – you can not see a flame when I am using the dry gas.


As you can see this home-made stove works well and in the right photo I even made a little stand for the coffee pot to hold it off the flame so more air can get into it. It takes a little experimenting and you may be able to just put your cooking pan or pot right directly on it, or you may need to get it more air with a stand, depending on your design. And there is a lot to be said for preheating it, especially if there is a breeze or cold weather, if you preheat it can help to keep it lit once you decrease the amount of air it is getting by putting a pot on top.
On a bit of a sentimental side note – that little coffee pot is one that my father used for many years. He’s gone now (he made it to over a hundred years old) but I keep the coffee pot both for sentimental reasons (I remember many a time when we started a fire and cooked out in the woods or at a park) as well as the fact that despite it being old and beat up it still heats coffee and water just fine. And my father was always a bit obsessed with using the most minimal wood fire to heat his coffee; he would have loved this homemade alcohol stove as well as the one that is the subject of this review.
So anyway, after making a few successful little tuna can, soup can, and cat food can stoves I decided to try a nicer manufactured one.
If you search Amazon and other sites you’ll find many many identical models or similar models sold by various companies, I picked on this one – the Famgee Portable/Camping Alcohol Stove Stove.


It’s all about 145 grams or 5 ounces with a diameter of 97 mm (3.8 inches) and a height of 64 mm (2.5 inches); so it is very small and light.
Using it is simple as putting the stove in the stand, pouring some fuel in, lighting it (again, keeping in mind if you are using something like 99% alcohol that the flame may be invisible), letting it warm/re-heat a bit, and then setting your pot, mug, or cookset on it.
The stand itself is quite interesting. At first glance, it may look like the stove sits into it in a certain way but there are many configurations. The stove has two indented areas in a ring around it which fits into the stand’s tabs. With the stand’s arms pointing upward the tabs on the inside of it can fit into the upper or lower indented areas in the stove, depending on how close you want it to what you are heating and how much air you need/want. You may have to adjust these protruding tabs on the stand a bit to hold the stove securely, and you may want to adjust these tabs after the stove is started but you really need to extinguish the stove and make sure it is cool before adjusting these. Or adjust them before starting the stove, ideally.
The upright arms on the stand may also need to be adjusted, depending on what you are heating normally. You can see in this photo that the legs on the cooking stand need to be bent inward a bit to fit this cup, though I could have also turned the stand upside down alternately.
 The stand can also be used with the arms pointing downward and your cooking pot or mug sitting on the circular part, this gives you a surface with more area. In this configuration, you can either put the stove right on the ground with the stand over it or slide the indentation rings into the three protruding tabs on the inside of the stand.
So in total, the stand gives you five different positions and configurations, with varying positions of how near or far the flame/heat is from what you are heating, and if you need a lower heat you can use the simmer ring piece – which works in any stand orientation (though you need to slide the handle through the triangular hole in the stand when the stand arms are pointing down).
The combo extinguisher and simmer ring have a little cover with a pop-out handle so you can make sure you are not going to burn your fingers when you use it, basically you pop the handle out and set this cover over the top of the stove when it is lit to extinguish the flame. It works great and perfectly, almost instantly snuffing out the flame. As I mentioned above though – high percentages of alcohol can burn invisibly so be aware of this. Even if it looks like it is out after using the cover to extinguish the flame keep in mind that it may still be burning and you can’t see the flame.
Once the flame is out the outside of the stove cools quickly, allowing you to stick it in your backpack fairly quickly.
As mentioned this extinguishing cover also acts as a simmer ring. You gently pop up at the silver tab that the handle hinge is connected to then rotate the silver part to the side and open, rotating it around the riveted part at the opposite end from the handle hinge. Pop-out the handle and adjust how open or closed the silver part is to decrease the amount of heat allowed through it (it also decreases the amount of air getting to the stove too) by carefully setting this over the top of the stove. Good for simmering and lower heat and warmups.
The fuel space holds a small amount of fuel, enough for maybe a couple of medium mugs of coffee.
I don’t trust storing fuel in this stove, despite the nice o-ring. I experimented with storing some fuel in it a few times while I knew that the stove was going to be held fully upright and I detected a faint amount of leakage a few times when it did get joggled to the side at an angle, and other times no leakage. Your results may vary here, you may want to store only a small amount of fuel in it to minimize the chance of leakage or not at all, or seal it in a bag. I prefer to store fuel, like the dry gas, in the plastic container it comes in which has a tight pop-top and then I put the storage container in a zip lock freezer bag just to be sure.
I also decided to get a windscreen after the experiments with my homemade stove and various makeshift windscreens, so I went with the N-A Brand 9-Plate Windscreen – again; you’ll find many identical models or very similar ones. Many of the similar ones work exactly the same way and have other types of designs, legs, stands, etc.
The windscreen is important as the stove is quite small with a small (though hot) flame so any sort of wind can diminish it significantly. Also the windscreen helps to hold the heat in and reflect it back (specifically this is referring to windscreens that are reflective of course). While mountain biking along a beach (see photo further down) the wind was so intense that experimenting with trying to keep the stove lit without the windscreen showed that it would quickly blow it out before it could preheat – but that was under pretty extreme conditions. The stove ran just fine with the windscreen around it.
The windscreen really seems to help the stove’s efficiency.


It is high enough to cover the stove, the flame, and most of your cooking pot (depending on what you are cooking with).
This is important for efficiency in wind or extreme cold BUT – you do need to be careful about reaching down and grabbing the cooking pot or mug or coffee pot as there can be a lot of heat gathered inside the windscreen area, and you do have to reach down a bit depending on cookware. And remember here – the flame when using high percentages of alcohol is invisible. A simple silicone oven glove or small silicone trivet can help out here, or a hiking glove.
 I first tried the Famgee Portable/Camping Alcohol Stove Stove under somewhat cool conditions and with the standard cooking materials that I would use with it – mid 40’s temperatures and low winds, a metal cup filled with approximately 18 ounces of cool but almost room temp water, 91% alcohol (rubbing alcohol), and the N-A Brand 9-Plate Windscreen.
With very little pre-heating (usually a good idea to preheat but testing it I fudged a bit) it took approximately ten minutes to make hot water. When I say ‘hot water’ that means a bit hotter than I can drink but not boiling hot. Around twelve minutes for the beginning of a boil and fourteen to fifteen for the full-fledged rolling boil.
I had filled the stove up to approximately halfway in the inner fuel section and in total it heated two cups of water (one for coffee and one for instant soup) and had about a third or less of the fuel in the stove reservoir left over. This was with no cover on the cooking pot/mug.
A note about the fuel left in the reservoir. Some people say that if you are planning on using the stove again and trust storing it in the built-in reservoir then you can leave this fuel in the stove (or have another container to store this fuel in separate from the one you poured new fuel from) but otherwise you want to discard it and not put it back into the original container from whatever you poured it out of. I’m not sure about this as there seem to be a lot of varying opinions. The fuel seems to be fine to pour back into the original container, and I have yet to find any issues with that. Why waste it? (As long as you aren’t planning on using it for anything else.)
An additional note here too – be aware when cooking anything that you may need something to protect your fingers and hands when accessing the mug or pot. Sometimes this can be the very thing you forget – ending up with burned fingers. A simple silicone oven glove or small silicone trivet is pretty easy to carry and can help you out when you are cooking on a full-blown camping fire too. At the very least be aware of the heat these stoves can put out and how hot things can be that are on or near them and use a mit, a pad, your gloves, or a bit of cloth if you are not sure.
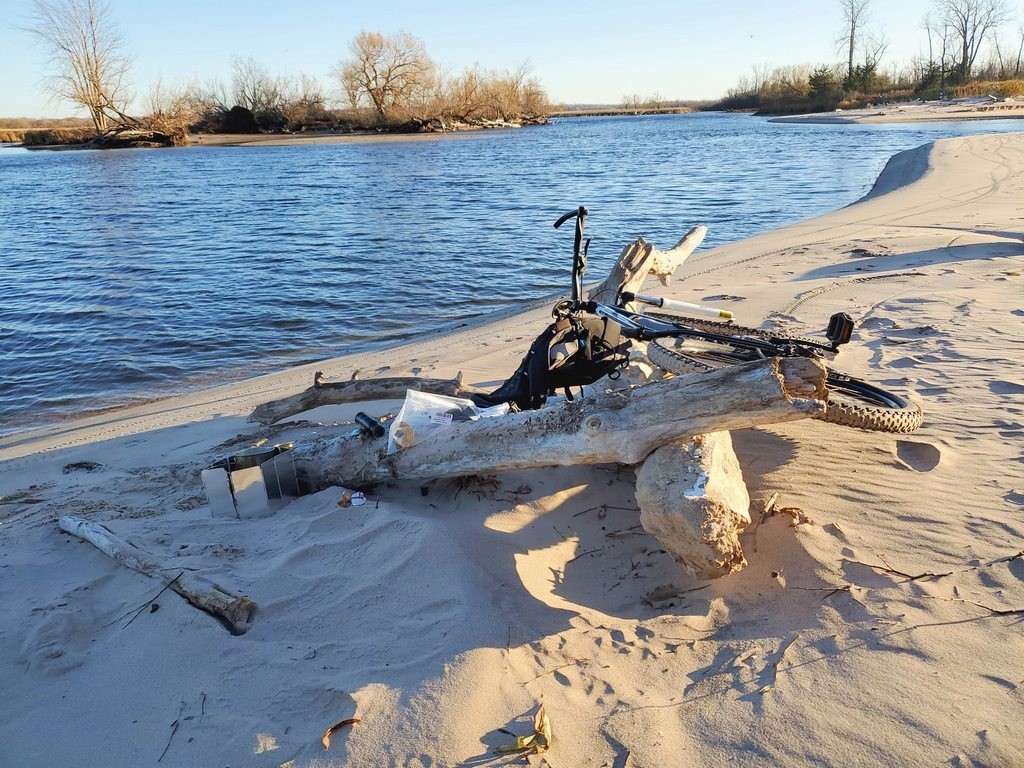
Using the strove while MTB’ing at the beach
A few more notes from experimenting – with a cover on the amount of time it takes to heat significantly decreases, and also pre-heating can really help it to get up to a cooking temperature. If you are impatient or in a hurry you can certainly put your cooking materials right on top but with colder temps you really need to give it lots of air, and it helps to preheat rather than struggling to get to that point and possibly having it go out. In warmer temperatures this is less of an issue but it still benefits from preheating, very similar to using a regular stove.
A few other practical tests included using it at a picnic, for coffee on an unseasonably warm Fall day as well as carrying it on my mountain bike for a relaxing coffee stop partly through a ride while on the beach.
On the warmer day it heated quickly, making two mugs of hot water in a short time.
For mountain biking the Famgee stove fits nicely in the Roswheel Attack Series extendable seat bag (see my review of this bag here), along with fuel, lighter, mug, water, and coffee as well as the regular seat bag tools and such. You can see a photo here – the day was windy but while the little cove was partially protected it still was fairly windy. The N-A Brand 9-Plate Windshield did great in keeping the gusty wind from decreasing the amount of cook time, or blowing the flame out before it got heated up.
I have been testing the stove on and off for a while and my last test was in more extreme conditions, as I gave it a try out in below-freezing temps. In the very cold – in my case heading toward single digits – it took quite a bit more time, and I had to turn the stand upside down with the stove sitting directly on the ground and the cooking pot/mug at the highest position that it could go as it really required lots of extra air circulation. It also required longer pre-heating as it tended to go out if I put the pot on top before it was up to cooking temperatures.
Frankly, it probably isn’t suited for near single-digit temperature conditions unless you have extra time for pre-heating, babysitting and monitoring it to make sure the flame doesn’t go out, and the time it takes to heat anything in those extreme temperatures is a lot longer.
In these very cold conditions it took well over 15 minutes to heat water to even just warm. Still fairly reasonable though the time needed watching it and heating and fidgeting with it makes it much less attractive as a cold-weather stove. And a bit problematic to keep running in the extreme cold AND windy conditions unless you have a good shelter. And of course for sterilizing water from a stream or river or snow it is going to need to be a good rolling boil for at least one minute or more, more time if you are at higher altitudes.
On a side note – it was so cold that my camera locked up while trying to film an accompanying video review so that was in fairly extreme conditions.

The extinguisher part works nicely, easily and immediately extinguishing the flame. The extinguisher cover also doubles as a simmer ring in that you can adjust the sliding cover to decrease the heat, as explained above. I briefly tested this and it worked well, but you do have to make sure it cools before you can slide the cover back into place to re-use it as the extinguisher.
The brass stove cools quickly, within minutes usually and is cooled and ready to be stowed in a reasonable amount of time.
As I mentioned above the stove and the windscreen both have nice little bags to carry them in and they are both small enough to carry in a small backpack or even a waist bag or shoulder bag of a small size, for hiking. For biking I recommend the Roswheel Attack Series extendable seat bag (see my review of this bag here) but it should fit into a multitude of bikepacking bags and mountain bike bags of any moderate size.
I’ve also been experimenting with separate carriers and bags for using it with backpacks as attachments instead of carrying the stove inside the backpack, so that the cooking materials are separate or can be slung from a belt or other bag in addition to attasching to a backpack. One good supplemental bag to carry it in is the Seibertron Falcon Compact Summit Bag which should fit any backpack, bag, or belt (with proper attachments) and the Saking MOLLE Tactical Water Bottle Carrier – the latter of which is the smallest option but requires a ‘lining’ to carry it securely as the carrier is made up of straps. My idea here is to allow as much space in a backpack and also store the fuel with the stove (separately in the fuel’s own container) and away from food or other things, as well as give me the option of carrying it without a backpack or attached on my person separately from the backpack if needed.
You really want to make sure that no matter what kind of fuel you use it is stored securely and has no chance of leakage. You can put whatever sealed fuel container you have in a separate sealed plastic bag as a backup bit of protection. Old soda bottles are pretty well sealed if you don’t trust the top of whatever fuel storage container that you are using, of course you want to test whatever bottle you use by standing it upside down for a bit to check for leakage. Unlike with petroleum-based fuels, alcohol won’t eat through a plastic bag but the bag does have to be sealed well.
Whatever fuel you use is going to have some toxicity, and probably a lot of smell – so you don’t want that contaminating anything else; whether it is food or clothes or your backpack or whatever you are carrying it inside of. The good thing about alcohol fuel is that it does evaporate quickly, but it and any the additives can leave behind a smell.
So for fuel you can buy 99% rubbing alcohol, which is what dry gas in the HEET yellow container would be – both of which work great. There are also other dry gas types, some of which may have a lower alcohol percentage. You can also use stuff like 91% rubbing alcohol, which is cheap as hell (though HEET and 99% alcohol is damn cheap anyway) but takes a little longer to heat and gives you a visual flame.
With the 91% alcohol, it will be sooty on the cup/pan and around the top of the stove and the stove may or may not get hot enough to bloom from the burner holes but burns from the middle – which works just fine otherwise.
With lower percentages, it can be VERY black and sooty. Like with 71% alcohol (it’s not going to burn with percentages that much lower than this anyway) you can get a good flame but lots of blackness on your stuff, which you really need to clean off before stowing anything as it will get all over your bag or whatever you are carrying it in. 91% burns much less sooty or not at all, and 99% alcohol or the HEET in the yellow container or other dry gas burns very cleanly (another kind of dry gas may have a lower percentage of alcohol). But the higher percentage of the alcohol burns invisibly so keep this in mind, especially when starting the stove and putting it out as you can’t tell that it is running.

Example of the ‘bloom’, burning drygas
I also have been experimenting with an approximately 50/50 mixture of 91% alcohol and the yellow container HEET drygas – it seems to burn very efficiently and also is very visible. Also, with a good but short preheat the stove begins to ‘bloom’ (the tiny holes around the side shoot a small ring of pressurized flames out around it instead of the flame coming from just the middle) – this seems to create a very stable, very hot and uniform heat versus just having the flame burning from the middle. I don’t really know about the science behind this but it seems to be a desirable thing to have happen with this sort of stove and from my own informal testing it seemed to be the best thing to have happen – and with 99% alcohol it is too invisible to tell.
In the photo you can see here is an example of the bloom (excuse the bad lighting).
The downside to the Famgee Portable/Camping Alcohol Stove Stove is that when using it with high percentages of alcohol fuel content it does make the flame totally invisible and possibly dangerous for those who are not paying attention, and it could conceivably be knocked over and spread invisibly burning fuel across the ground. It’s small so it has a very low profile so I don’t believe that this is a major issue but being aware of the invisible flame is something of concern for sure.
And being small it is prone to having wind affect its performance, so using it with the N-A Brand 9-Plate Windscreen is almost essential for a lot of conditions.
But otherwise, I have to say that I am wildly absolutely impressed with the simplicity and efficiency as well as the tiny size of this stove, stowing almost anywhere. And the fact that fuel is cheap and so readily available.
The system heats quickly and is versatile in use and does its job and does it well. It’s really hard to complain about it, at least for the single pot/mug/cup use. For larger cooking purposes you of course would want a larger stove.
I believe it is well worth the price and is great for those times when you need a small single-burner stove.
I also still have the homemade one that I described above, and found that they both fit in a small space together and I can even run them both at once – one for a coffee and one for soup or for two cups of coffee at once. Though either does also heat water in a small coffeepot too.
Make sure you check out my review video to see this stove in action, at this link or near the bottom of this post.

I have become quite efficient at whipping this out and having coffee ready for my wife and I in less than fifteen minutes’ time – that’s heating two separate containers of water, one to near boiling and one to hot. And also using the whole thing in the wind.
I have added a few things over time.
Firstly a different bag for more securely carrying the stove, fuel, pot, and anything else I need in one self-contained bag – the WYNEX Tactical Molle Pouch. This is a nice cylindrical bag that holds everything securely, including keeping any fuel containers I am using upright (though none of the ones I use leak, but better to be safe than sorry). This bag can have a shoulder strap attached and be taken on its own or attached to almost any backpack with any type of loops, straps, or MOLLE attachment points. If you have any sort of Maxpedition-style bag or clone, especially of the Falcon series or Gryfalcon series then this bag should attach modularly right to the side using the included straps, otherwise it can be strapped on using the buckets and straps or attached via MOLLE.


More stable home-made pot stand
The stand that comes with this stove works okay, but if you are using it in the configuration with the ‘feet’ sticking upward then you may find that a pot may not be very secure on the top and may be fairly unstable and unsteady, sliding or even falling off. This of course depends a bit on the pot you are using, and if you are using the stand with the rounded part on the top this is less of or not an issue.
 So to do that I then proceeded to attach the three pieces together securely, holding everything in place as I used the small needle-nosed pliers to wrap the smaller bendable wire around the various pieces in strategic places to secure them all together. Specifically, I wrapped the end with the U-shape bend on the shorter single leg to the bent junction of the longer piece of wire/legs and then wrapped this around and around to the fan grid. Then I wrapped the small bendable wire around the outer part of the fan grid and around each leg where it intersected it.
Listen to this post on Spotify


